
Messing around with metal lets you make stuff that’s not just tough, but actually handy too. Whether you’re welding, bending, or just shaping bits of scrap, every little project sharpens your skills and gives you something you’ll actually use. It’s cool how a simple idea can turn into a functional item that just fits into your everyday routine.
You really don’t need a fancy setup or a ton of tools to get going. Simple builds are a great way to nail down essential techniques and still end up with something useful. Here’s a bunch of ways you can take raw metal and make stuff for your house, garden, or wherever you work.
1) Welding a custom fire pit

A fire pit is a solid first welding project. Grab some basic steel sheets or whatever metal you can recycle. Cut your pieces, tack them together, and you’ll have control over the shape before you finish the welds.
Try working from the center outwards when welding, spreads the heat better and keeps things from getting all warped.
Stick on some simple legs or a base plate for stability. After welding, grind the sharp bits down and either leave it raw or slap on a heat-resistant finish if you’re feeling fancy.
2) Building a metal garden trellis

Garden trellises are easier than they look. Grab some steel rods, rebar, or maybe wire mesh for a sturdy frame that can actually handle climbing plants.
Sketch out the size and shape you want. Rectangles are simple, but bending rods into arches or zig-zags is fun if you want something different.
Bolt or weld the frame together and anchor it in the ground or on a fence. No more droopy vines.
3) Fabricating a steel coffee table

A steel coffee table is a classic project. Weld up a simple frame with square or rectangular tubing, strong but not too heavy.
Cut your pieces, tack them together, and double-check that everything’s square before you weld it fully. Wobbly tables are the worst.
Once you’re done, grind the welds smooth and pick a finish – paint, powder coat, whatever. Top it off with wood, glass, or another metal sheet and you’re set.
4) Creating a scrap metal sculpture

Turning leftover metal into a sculpture is honestly pretty satisfying. Old tools, pipes, or random car bits work surprisingly well. Dig through your pile, see what shapes fit together, and just start playing around.
Welding is your main move here. Even if you’re new, try simple figures or abstract stuff. With time, you’ll get better and can try more detailed builds.
Stick these sculptures in your garden or workshop, they add a cool vibe and keep junk out of the trash.
5) Making decorative metal wall art

Sheet metal, rebar, even scrap bits – these all work for unique wall art. Simple shapes cut out with a plasma cutter or angle grinder can look awesome, and you don’t need to be a pro.
Try mixing copper and steel for a bit of contrast. Hammer in some texture or mess around with heat coloring for more personality.
Hang it up with brackets or welded hooks and you’ve got a piece that’ll outlast most store-bought decor.
6) Constructing a sheet metal toolbox
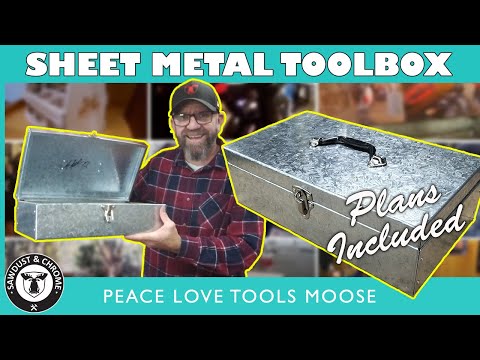
A sheet metal toolbox is one of those projects that’s just useful. You get to practice measuring, cutting, bending, and fastening, plus you end up with something you’ll use for years.
Sketch out a basic box with a lid and handle. Cut the panels, bend the edges for strength, and fasten them with rivets, screws, or spot welds.
You can customize the inside to fit your tools, and if you want, add a lock or extra compartments.
7) Crafting a wrought iron candle holder

Wrought iron candle holders are a fun blacksmithing starter. Grab your basic tools: anvil, hammer, tongs. Simple bends and twists are all you need for something that’s sturdy and looks good.
Heat up the iron, shape a base and arms for the candles. Even just a spiral or curve works well and keeps things simple.
Brush off the scale, then slap on a protective coating to keep rust away. Now you’ve got a piece that’s both useful and cool-looking.
8) Designing a metal coat rack

A metal coat rack is a quick weekend job. Use steel or aluminum for the frame – just a few bars, hooks, and a base plate. Even a hacksaw and drill can get you most of the way there.
Weld or braze the joints if you want it extra strong. Square tubing or flat bar for the frame, round rod for the hooks – easy.
Cut out your own shapes or use pre-made hooks if you’re not up for plasma cutting. Either way, it’ll be way sturdier than anything you’ll find at the store.
9) Assembling a steel wine rack

Steel wine racks are pretty straightforward. With some basic metalworking tools and a bit of patience, you’ll have something both useful and nice to look at. Use straight rods or flat bars for the frame, cutting them to size with a hacksaw or grinder.
Smooth out the edges so you don’t snag yourself. Weld, braze, or bolt the frame together, whatever you’re comfortable with.
Add crossbars or loops for the bottles, then finish it off with a polish or a coat of paint to fight off rust.
10) Forging a set of metal bookends

Forged bookends are practical and give you a chance to practice shaping and finishing. Grab some flat bar or square stock, heat it up, and bend it into a base and upright.
Throw in a twist or stamp a design for a bit of flair. Just keep the size consistent so they look like a pair.
Wire brush or polish the surface once it’s cool. A clear coat or wax keeps the metal protected and shows off that forged look.
11) Building a metal mail organizer

Mail organizers made from sheet metal or scrap are super handy. Cut and bend your panels to make compartments for letters and bills. Keeping the design simple means you’ll actually finish it.
Mount it on the wall by your door or set it on a desk. Tiered styles make sorting easy, but a flat box works fine too. Stick on some labels for extra organization.
A quick paint job or clear coat will keep it from rusting and looking messy.
12) Fabricating a metal plant stand

Plant stands are a great use for leftover rods, flat bars, or even old rebar. Basic welding or brazing skills are all you need, and it’s nice to use up scraps.
Sketch out a design that fits how many plants you want to show off. Cut your pieces, weld or bolt them together, and make sure the base is sturdy so nothing tips over.
Grind off any sharp edges and finish up with a coat of paint or something rust-resistant, especially if it’s going outside.
13) Welding a steel bike rack

Building a bike rack out of square tubing or steel pipes is actually pretty straightforward. You don’t need a pile of materials, and the design can stay simple, just parallel bars welded onto a base frame.
First, cut your steel pieces to length and lay them out on a flat surface. Tack weld the frame together, then add the vertical supports before finishing the welds.
After the structure feels solid, grab a grinder to smooth out any rough welds for a cleaner look. You can leave the rack bare if you like the industrial vibe, or throw on some paint to keep rust away and make it last longer.
14) Creating a metal key holder
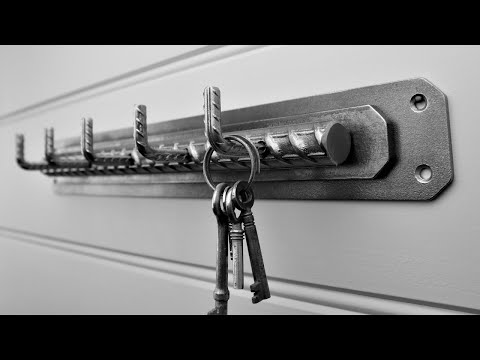
A key holder doesn’t have to be complicated. Grab a flat metal strip, drill a few evenly spaced holes, and attach some hooks. Mount the strip on a wall or a chunk of wood, now your keys finally have a home.
Want something tougher? Try welding on small rods or shapes for a more custom rack. You can match the look to your space, whether you’re into modern or a bit of rustic flair. Custom design is honestly the fun part.
Scrap metal works great for this. With a bit of sanding and some paint, leftover pieces can turn into a practical, sturdy key holder.
15) Making a metal picture frame

A metal picture frame can give your photos or artwork a really sharp, modern edge. Usually, you’ll cut aluminum or steel to size, weld or fasten the corners, and then sand everything smooth.
Paint or powder coating is a good idea for protecting the frame and helping it fit your style. You might want to attach some brackets or tabs on the back to keep the picture and glass securely in place.
If you’re looking for a way to practice measuring, cutting, and welding, this project is a solid pick. You end up with something useful to hang up, too.
16) Constructing a metal bird feeder

Making a metal bird feeder is pretty doable with sheet metal or small steel tubes. Simple patterns make it easier to cut and shape everything before welding or fastening the pieces together.
Add a hook or chain so you can hang it wherever you want. A sloped roof keeps the seed dry, and a few drainage holes stop water from pooling up.
If you want it to look a bit nicer, smooth the edges with a file and hit it with a weather-resistant finish. That way, it’ll last outside and look decent, too.
17) Crafting a metal book stand

A book stand from sheet metal or steel rods comes together with just a few cuts and bends. A backrest and a lip at the bottom are all you need to keep books from sliding off.
You can weld or bolt the parts together, depending on what you’ve got handy. Adding rubber feet or smoothing out sharp edges is a nice touch, nobody likes scratched tables or sliced fingers.
These stands are handy for cookbooks in the kitchen or manuals in the shop. You can keep the finish plain or polish it up for something a little shinier.
18) Designing a metal door knocker

Door knockers are actually pretty fun to make. Scrap rebar, flat bar, or even an old wrench head can work. The trick is just having a solid striking plate and a ring or bar that swings.
Cut and shape the metal pieces using a grinder or hacksaw. Weld or bolt a back plate on so it’ll stay put against the door.
A small spacer behind the knocker can help keep fingers safe and give it a better swing. Once you’ve got it all together, polish it up or slap on some paint for a cleaner finish.
19) Assembling a steel storage shelf

Start by laying out all your parts and hardware so you’re not hunting for stuff halfway through. Having everything close by just makes the job easier and keeps you from losing bolts.
Connect the uprights and crossbars according to the instructions. Keep a level handy and check alignment as you go – nobody wants a wobbly shelf once it’s loaded up.
When the frame’s together, slide or bolt in the shelves. Tighten everything evenly and give it a shake to make sure it feels sturdy.
20) Forging a metal desk organizer

Ever thought about making your own desk organizer from scrap metal? All you really need are a few flat pieces of steel (or whatever metal you’ve got lying around), and you can shape them into little compartments for pens, pencils, or those random tools that always seem to vanish. Cut the pieces, then just bend and weld them into a box or tray – nothing too fancy.
Want more sections? Add a couple dividers. If you’re feeling creative, grab a wrench or hammer and throw in some decorative details so it’s not just a boring box.
Honestly, it’s a solid way to get some practice with cutting, bending, and welding. Doesn’t eat up much material, and you actually end up with something handy for your desk.