
Getting started at the forge can feel like a lot, but honestly, the trick is to keep it simple and just build up your skills one step at a time. You can grow your confidence pretty fast by working on small, practical projects that teach the core techniques without needing fancy tools or a ton of experience. Every piece you make adds a bit more control and purpose to your metalwork.
As you try different ideas, each project brings a new skill to the table, but you’ll still end up with something you can actually use or give to someone. From handy tools to little decorative things, these projects give you a straightforward way to practice and improve while making stuff that’s not just for show.
1) Tongs

Pretty much every blacksmith you meet will tell you that a good pair of tongs is a must, and making your own is a classic first project. You’ll get to practice drawing out metal, punching holes, and riveting pieces together.
When you craft tongs, those skills pop up in almost every other thing you’ll make later. It’s all about learning to shape steel and manage the heat.
Don’t stress about perfection on your first set. Even a rough pair will help you handle hot metal safely while you keep getting better.
2) Chisel

Getting started making a chisel just takes a small piece of tool steel and a steady heat. You’ll learn to shape, taper, and control the edge.
Once you’ve got the shape down, you’ll harden and temper the blade so it actually holds up. That heat treatment step is something you’ll use again and again.
A homemade chisel comes in handy for cutting and shaping metal on future projects. Plus, making your own saves you a few bucks and gives your confidence a nice boost.
3) Bottle Opener

Forging a bottle opener is one of those projects where you don’t need much, just some basic tools and a bit of steel. It’s simple, but it gives you practice with shaping, tapering, and punching.
A lot of people start with a flat bar, sometimes even a railroad spike. You’ll learn how to drift a hole and make the hook for prying off caps.
When you’re done, you’ve got something you’ll actually use. These make great gifts, too, and you’ll get a better feel for controlling the heat and your hammer.
4) S Hooks

S hooks might just be the easiest starter project out there. You’ll get to heat, taper, bend, and twist without dealing with anything complicated.
They’re useful everywhere! hanging stuff in the shop, the kitchen, or even outside. You can make them any size you want.
Try to keep your tapers even and curves smooth. A clean bend means a stronger hook and a nicer look.
5) Skewers

Skewers are about as straightforward as it gets. You’ll practice tapering and shaping long pieces of metal, and you can keep them plain or throw in some decorative twists.
Working on these helps you get the hang of heating the whole length evenly, which comes in handy for other stuff.
They don’t use much material, and you can crank out a set pretty fast. Plus, matching skewers are great for grilling and give you a chance to practice repeating the same moves.
6) Holdfast Tool

A holdfast is just a simple clamp that keeps your work steady on the anvil. It wedges into a hardy hole and grips tight. This one’s good for practicing shaping and bending.
Start with a steel rod that’s a bit smaller than your anvil’s hardy hole. Heat it up, bend it, and forge the end into a hook. The springiness of the bar gives it enough pressure to hold your stuff in place.
Once you’ve got one, you’ll probably use it all the time. It’s super handy for keeping both hands free when you’re hammering away.
7) Simple Fire Poker

Making a fire poker is pretty doable with just some basic forging skills. You’ll usually draw out a taper for the point and shape the handle on the other end.
Throwing a twist in the shaft adds a bit of strength and style, but doesn’t make things harder. You’ll get to work on hammer control, tapering, and twisting all at once.
It’s something you’ll actually use for tending fires, and it’s tough enough to last. Not a bad way to build up your skills while making something useful.
8) Keychain

Keychains are quick and easy, just grab a short piece of steel and try out some basic hammering moves. They don’t need much material, and you can finish one way faster than most projects.
Mess around with different twists or stamp on a little design to make each one different. These small projects are perfect for practicing precision.
They make solid gifts or cheap things to sell at markets. Since they use so little steel, you can make a bunch and try out new ideas without spending much.
9) Letter Opener
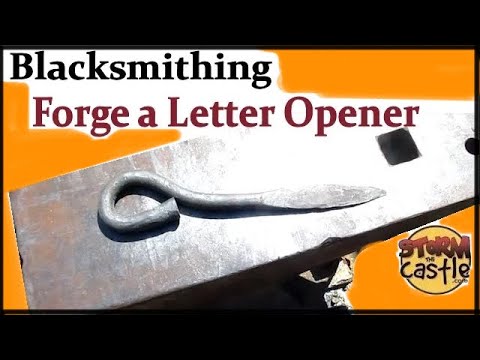
A letter opener is a nice, useful project for beginners. You’ll get to work on drawing out, tapering, and maybe a little twisting, all without needing much metal.
They’re small enough to finish quickly, so you don’t get bogged down. No need for a big forge or long stock, either.
Adding a scroll or a twist on the handle gives you a shot at practicing some details. In the end, you’ve got a practical tool that’s easy to gift and shows off what you’ve learned.
10) Hooks for Hanging

Hooks are probably the easiest thing you can make at the forge. Taper, bend, and curl the metal into shape – nothing fancy. This project builds skills you’ll use over and over.
You can make J-hooks, S-hooks, or even wall hooks, depending on what you want. Each one lets you play with different shapes and sizes.
They’re great for hanging tools, coats, or extension cords around the shop. Quick to forge, super practical, and a good way to practice making things consistent.
11) Small Hammer

Making a small hammer gives you a useful tool and a chance to practice shaping and balancing metal. You’ll draw out the handle, form the head, and see how the weight changes the swing.
Start with a simple chunk of steel, punch the hole for the handle, and shape the striking face. It’s a good way to get used to heat control and hammer accuracy.
When you’re done, you’ll have a lightweight hammer for detail work. It’s also a nice confidence boost before moving on to bigger tools.
12) Utensil Handles

Making utensil handles is a good way to practice shaping metal into comfortable, practical forms. Just start with some flat bar and hammer it into a grip that feels right.
You can try out twists, curves, or even a few little decorative touches without making things complicated. Handles for spoons, spatulas, or ladles are all good places to start.
These don’t use much steel and you can finish them pretty quickly. If you want, you can try matching up a set of utensils, which is a great way to work on making your hammering and shaping more consistent.
13) Garden Markers

Making simple garden markers is actually pretty fun. Just forge some small, flat pieces of metal and stamp the plant names in. A punch set does the trick for clear letters.
It helps to shape the ends into points so they push into the dirt without a fight. Maybe round off the edges or curl the top for a bit of flair – why not?
Scrap steel is totally fine for this, and you hardly need any. These markers last a long time outside and add a handmade vibe to your garden that you just can’t buy at the store.
14) Napkin Rings

Forging napkin rings is a great way to practice the basics. You don’t need much steel, and you can finish a set pretty fast. When you’re in the mood for something small, these hit the spot.
Try messing around with shapes and textures. Sure, a plain ring works, but twists or hammer marks make each one stand out. It’s a good chance to get a feel for your hammer and tongs.
People love handmade tableware, so napkin rings make easy gifts or things to sell. Plus, you can price them so folks don’t have to think twice.
15) Door Knocker

Making a door knocker is a solid way to get the hang of shaping and joining metal. You can keep it simple – a ring and plate – or get fancy if you’re feeling brave.
You’ll pick up skills like bending, punching, and riveting along the way. Railroad spikes or flat bar stock are both good starting points.
Once it’s done, you’ve got a useful piece you can actually put on a door. It’s a straightforward project that helps you get more comfortable with the basics.
16) Decorative Nails

If you want to work on your hammer control and shaping, decorative nails are a good bet. They barely use any steel, so you can mess up a few and not care.
Start with square stock, taper it down to a point, then make the head. Flat heads are fine, but pyramid or textured ones look cool too.
These nails fit into small woodworking projects or as accents on bigger forged stuff. Making a bunch helps you get faster and more consistent, but it’s never boring.
17) Wall-mounted Coat Hook

Here’s a project where you can practice a bunch of blacksmithing skills at once, drawing out, tapering, and scrolling all show up in a wall-mounted coat hook.
Grab a short piece of steel, forge a taper for the hook, then roll the end into a scroll or just curve it. Punch or drill a hole at the base so you can bolt it up.
You end up with something you’ll use every day. These hooks are sturdy enough for coats, hats, or whatever you want to hang.
18) Candle Holder

A simple candle holder is a classic project – just grab a piece of round stock, a hammer, and an anvil. It’s a nice way to get better at shaping and tapering, and you can finish one pretty quickly.
Draw out one end for the base, then curve or twist the other end to hold the candle. Scrap steel is fine, so don’t worry about using up your good stuff.
You get to practice bending and scrolling, and you’ll have a nice gift or decoration when you’re done.