Scrap wood tends to pile up way faster than you’d think, doesn’t it? It sits there in your garage or tucked in the corner of the workshop, just waiting for a purpose. Instead of letting those odd pieces collect dust, why not turn them into something useful or even a little bit fun? Even the tiniest scraps can become practical projects that bring some character and function to your space.
With a little effort, you can make things that organize your stuff, add a touch of personality to your decor, or even work as thoughtful handmade gifts. None of these require fancy woodworking skills, just some basic tools, a chunk of your time, and the willingness to give leftover wood a new life.
1) Wooden Coasters

Got small scraps? Those are perfect for drink coasters. Grab a saw, some sandpaper, and cut the pieces into squares or circles, whatever you like! Smooth out the edges so they won’t scratch your table.
If you want to get creative, glue different types of wood together for a striped effect. Once it’s dry, trim and sand everything until it feels right.
A splash of paint, a bit of stain, or even just a clear finish will help protect the wood from moisture. You can keep them plain, or doodle on some patterns if you’re feeling artsy.
2) Floating Wall Shelves

Scrap 2x6s, plywood, or leftover boards can easily become floating shelves. These work pretty much anywhere – living room, bathroom, wherever you need a little extra storage.
Cut your boards to the length you want, then make a hidden frame or support that anchors into the wall studs. The outer boards slip over that frame, so the shelf looks clean with no brackets in sight.
Give it a quick sanding and a coat of paint or stain. It’s a simple way to use up scraps and get some practical storage at the same time.
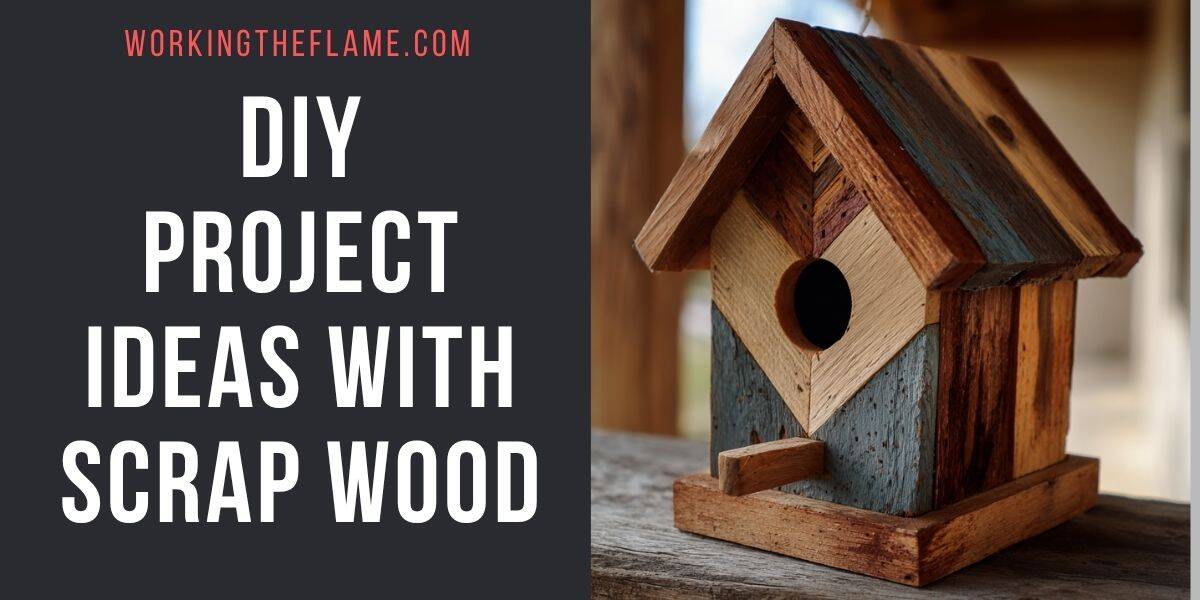
3) Birdhouse

Leftover wood? That’s all you need for a basic birdhouse. Grab a few flat boards, some screws or nails, and a drill.
Cut the panels for the base, sides, roof, and front. Don’t forget to make an entrance hole in the front, and maybe poke a couple of drainage holes in the bottom so it doesn’t get soggy.
If you like, add a tiny perch below the entrance. A coat of paint or sealer will help it stand up to the weather. Hang it from a tree or mount it on a post, it’s up to you.
4) Planter Box

Turn leftover boards, old pallets work great, into a rustic planter box. Just cut four boards for the sides and a few for the base, then nail or screw it all together.
Drill some drainage holes in the bottom so your plants don’t drown. If you want it to last outdoors, cedar is a solid choice, or just slap on a sealant for protection.
5) Key Holder Rack

Small scraps are just right for a key holder by the door. A flat board and a handful of hooks do the trick.
Mount it on the wall with a couple of screws. You can leave the wood as is or add a quick finish – totally depends on your vibe.
Want it to do more? Add a mini shelf for mail or sunglasses. Super handy, and you don’t need anything fancy to make it.
6) Picture Frame

Leftover wood pieces can make surprisingly nice picture frames. Cut your boards to size, sand the corners, and glue or nail them together. A clamp helps keep everything tight while the glue dries.
A finish totally changes the look! Stain brings out the wood grain, paint gives it a modern feel, or just leave it raw for that rustic charm.
Use them for photos, art prints, or just as wall decor. Making a batch at once is a smart move if you want a few gifts ready to go.
7) Jewelry Organizer

Scrap wood can turn into a jewelry organizer in no time. Just a flat board, a few hooks, and maybe some paint or stain. It’s an easy way to keep necklaces, bracelets, and earrings from tangling up.
Mount it on the wall to save space, or let it stand on your dresser. Change up the number of hooks or add shelves if you need more storage.
No need for complicated tools, a saw, drill, and sandpaper will get you there.
8) Wine Rack

Leftover wood can become a wine rack with just a few boards and some screws. You don’t need much – scrap 2x4s or pallet wood make a sturdy base.
If you want, add angled slots or cutouts so bottles don’t roll around. A shelf for glasses is a nice bonus.
Sand it smooth and stain or paint it. Even rough wood looks good once it’s cleaned up a bit.
9) Candle Holders

Small scraps, blocks, or even branches work for candle holders. Drill a hole to fit a tealight or taper candle, then sand the edges so they’re not rough.
You can leave the wood natural, or paint and stain for a different look.
Make a few and group them together, or just do one at a time, either way, it’s a quick way to use up those tiny leftover pieces.
10) Desk Organizer

A desk organizer is a smart way to use up odds and ends from the scrap pile. Small pieces are usually enough for compartments to hold pens, clips, or sticky notes.
Cut the wood to size, attach the pieces into a box, and add dividers if you want separate sections.
Sanding the edges keeps it from feeling rough, and you can finish it with paint or stain. It’s a simple way to keep your desk a little less chaotic.
11) Phone Stand

Turn a scrap of wood into a phone stand with just a couple of angled cuts and a notch. It’ll keep your phone upright on your desk or nightstand.
This is a perfect way to use up leftovers from bigger projects. Thin pieces can be glued together if you need more strength.
Add a groove for a charging cable if you want. It’s quick, handy, and honestly, you’ll probably end up making more than one.
12) Serving Tray

Leftover boards can become a serving tray with just a saw, screws, and some sandpaper. Glue a few scrap 1x4s together for the base.
Handles really finish it off – metal pulls, wooden dowels, or even rope if you’re going for a casual look.
Finish it however you want: paint, stain, or just a clear coat. It’s practical, quick, and a great way to use up smaller wood pieces.
13) Wooden Toys

Leftover wood is perfect for simple toys, blocks, cars, maybe a pull-along animal if you’re feeling ambitious. You don’t need much, and basic tools like a saw and sander are usually enough.
Kids love toys that feel good in their hands, so round off sharp corners and make sure everything’s smooth. A little sanding makes a big difference.
Paint or stain if you want to add some color, or just keep the natural wood look. Either way, you end up with sturdy toys, and you don’t have to spend anything extra.
14) Cutting Board

If you’ve got some scrap hardwood lying around, why not turn it into a simple cutting board? All you really need are a few tools and a bit of patience. Trim your pieces so they’re roughly the same width and length, close enough is usually fine.
Glue the strips together side by side, clamp them up tight, and just let them sit overnight. The next day, sand the whole thing until it feels smooth and even; don’t stress if it’s not perfect.
Rub on some food-safe oil to protect the wood and bring out the grain. It’s a nice way to use up leftovers, and honestly, homemade boards just feel better in the kitchen.
15) Napkin Holder

Small scraps? They’re perfect for a napkin holder. You don’t need to be a woodworking pro, just make a few cuts, sand the pieces, and glue or nail them together.
Go for a simple U-shape or slant the sides a bit so napkins stand up and are easy to grab. If you’re feeling creative, paint or stain it to match your space.
This is a great way to use up odds and ends, and even tiny offcuts from other projects can be enough for a handy holder.
16) Wall Art Panels

Scrap wood can become wall art that actually makes a plain wall pop. Cut the pieces into strips or blocks, then mess around with the layout on a backing board until it looks interesting.
Mix up wood tones for contrast, or sand and stain everything for a more polished vibe. Even the smallest offcuts can work if you fit them together like a puzzle.
Hang up one panel or line up several for a bigger display. Raw, rustic scraps or neatly finished pieces – they all work here.
17) Magazine Rack

A few leftover boards can easily become a magazine rack to keep reading material organized. Wall-mounted racks save space, but a freestanding one is nice for moving around.
Just cut your wood to size and screw or glue everything into a simple frame. Sand the edges so it feels smooth, and add paint or stain if you want it to look a bit more finished.
If you’re into experimenting, try painting it to match your room. Even a single board can work for a minimalist version.
18) Small Storage Box

Scrap wood is just right for a little storage box, perfect for screws, craft bits, or keys. Cut a few pieces to the same size and fasten them with nails or glue. Give the edges a good sanding so it’s nice to handle.
Toss on a lid or divider if you want it more useful. Leave it plain for that rustic look, or paint it to match your style. It’s one of those projects that comes together quickly and actually gets used.
19) Recipe Book Stand

A couple of scrap wood pieces can become a recipe book stand that props up your cookbook or tablet while you cook – so much better than juggling pages with messy hands.
Cut a flat base and add a back support at an angle so your book leans just right. A small lip along the bottom keeps pages from sliding off.
If you want it to fold away, hinges or a folding back piece make it easy to stash. Even small boards are enough for this, and it’s surprisingly helpful.
20) Plant Stand

Leftover wood is great for a plant stand, no fancy tools required. Even little scraps can make a sturdy base for your favorite potted plant.
Stack pieces for a tiered look if you’ve got more than one plant and not much space. Works especially well by a sunny window.
Or, if you’re into the modern vibe, attach hairpin legs to a round or square wood top. You get a cool look and use up what’s already in the scrap pile.
21) Tool Caddy

A tool caddy is one of those quick wins. A few scraps, some basic cuts, and you’re set. You just need a base, two sides, and a handle across the top. A dowel or even a chunk of round scrap wood does the trick for the handle.
Once it’s all together, it’s handy for hauling tools, craft stuff, or cleaning supplies around. Sand it down and maybe add a coat of paint or stain, totally up to you!
22) Pet Bed Frame

Give your pet a cozy spot with a simple bed frame made from scrap wood. Just cut the pieces to size, sand them a bit, and screw everything together for a sturdy base.
Rails on the sides help keep the cushion from sliding off. You can paint or stain the frame, or just leave the wood as-is for a more natural look.
Old cushions or a spare pillow make for an easy mattress. Using reclaimed boards or pallet wood keeps things cheap and practical.
23) Wooden Clock

Leftover wood can turn into a clock that’s actually worth hanging up. Grab a basic wall clock kit for the hands and mechanism – the rest is up to you. Scrap plywood, pallet wood, or even a chunk of an old shelf all work.
Cut out a circle or square and sand it smooth. Drill a hole in the center for the movement. After you attach the kit, you can leave the face plain or paint on numbers if you’re feeling precise.
Most kits come with mounting hardware, so hanging it is easy. It’s a practical way to use up scraps without much fuss.
24) Garden Markers

Scrap wood makes solid garden markers that outlast those flimsy plastic tags. Cut small pieces into stakes or rectangles, then write plant names with paint, marker, or even a wood burning tool.
No need for fancy supplies, just a few offcuts, maybe some twine, and a bit of paint. They’re handy for keeping track of what’s planted, especially when everything looks the same at first.
Plus, they add a bit of handmade charm to your garden beds.
25) Coat Hooks

Got a leftover board? That’s all you need for some coat hooks, perfect for an entryway or mudroom. Just add a few sturdy hooks and you’re set. Scrap wood works great and gives the project a bit of character.
Drill a few pilot holes, screw in the hooks, and mount the board to the wall. Reclaimed or weathered wood looks especially good, honestly.
Mix up hook styles or finishes if you want something different. Old fence boards or salvaged beams? Those make for a rustic touch.
26) Desk Name Plate

A small block of scrap wood is all it takes for a desk name plate. Walnut, maple, pine – whatever you’ve got. Sand it smooth, and then get creative.
Paint pens, stencils, or a wood-burning tool let you add your name or a little phrase. If you’ve got a CNC router, you can carve out the letters for a super crisp look.
Set it on your desk and you’ve got a quick project that adds a personal touch, no need to overthink it.
27) Bookends

Scrap wood makes surprisingly sturdy bookends. Cut some blocks, sand the edges, and let the wood grain show. Heavier pieces, like log slices or thick offcuts, work best for keeping books upright.
If you want, shape the wood into houses, animals, or whatever design you like. A scroll saw or jigsaw helps if you’re after more detail. Paint or leave them raw, depending on your mood.
Attach old toys, hardware, or metal scraps for extra weight or just for fun. It’s a good excuse to use up odds and ends.
28) Wooden Puzzle

Got some scrap wood lying around? You can actually turn it into a wooden puzzle that’s surprisingly fun for both kids and adults. Just cut a few small blocks or odd shapes from whatever leftovers you have, and then sand down the edges so they fit together nicely, no one likes a splinter mid-puzzle.
You could try a sliding puzzle, or maybe experiment with interlocking pieces, or even go wild and make a box with a little hidden compartment. These don’t take much wood at all, and you can size them up or down depending on the scraps you’re working with.
If you want it to last, a quick finish or splash of paint does wonders. Personally, I’d keep the design simple; it’s more fun when it’s challenging but not impossible, right?
29) Letter Holder

If you’ve got a handful of scrap wood, why not make a letter holder for your desk or the entryway? Just cut a couple of flat panels for the sides and some thin strips for dividers, then stick it all together with glue or a few tiny nails.
Give the edges a good sanding (no one wants their mail snagged) and if you’re feeling fancy, slap on some paint or stain. It’s a quick little project, but honestly, it keeps the mail chaos under control and puts that leftover wood to good use.
If you’re short on surface space, you could even add a couple hooks and hang it on the wall. Why not?
30) Desk Drawer Dividers

Scrap wood can be surprisingly handy for making quick desk drawer dividers. Just cut a few pieces to fit the drawer’s width and length, and slide them in. Suddenly, there’s a spot for pens, cables, or those little tools that always get lost.
If you cut the wood snug enough, there’s no need for nails or screws. That’s a relief, because who wants to fuss with hardware for something this simple? Plus, it’s easy to rearrange if your stuff changes or you get a new gadget.
Leftover wood keeps the cost at basically zero and lets you tweak the layout however you want. It’s up to you how many sections you make, and honestly, it’s kind of nice to have a drawer that actually fits your daily chaos.