
List of Easy Pyrography & Wood Burning Ideas for Beginners

Pyrography is the art of burning images into a wood surface. Pyrography has been around for thousands of years and continues to enjoy popularity as a traditional and beautiful art form that anyone can learn.
While the techniques and tools used in pyrography can be intimidating to beginners, wood burning is made more accessible with online learning resources like YouTube videos.
Plus, stencils and customizable designs make it easier than ever to make your own works of wood burning art. Many videos use stencils to produce a beautiful finished project.
Pyrography artists of all skill levels can make easy, quick, and affordable projects with the help of online tutorials like those discussed here.
What Tools Do I Need for Beginner Pyrography Projects?

All of the projects listed below can be worked on using basic pyrography tools and materials. You will need a wood burning machine with multiple heat settings, a pen with interchangeable tips or several pens with different tips, wood of your choice, and any safety equipment that you have on hand such as gloves, eyewear, and, ideally, a desk fan for ventilation.
Most beginner projects use basic line work as the main technique so knife-shaped pen tips and other tips for burning lines are necessary.
Shader tips will also be useful depending on the designs you choose to burn. Several of the projects discussed below feature items like wooden spoons, eggs, and cutting boards as the burning material, but any light colored wood board will work.
Most of the projects featured in this article use pre-made design stencils as their outline for their artwork. You can find similar patterns and designs for affordable prices on websites, such as Amazon or Etsy. There is a wide range of images to choose from such as wildlife and mythical creatures.
There are also some books aimed at beginner pyrography artists that share basic tips and tricks and include ready-to-use wood burning patterns, such as some of those recommended in our pyrography books article here.

- This wood burning kit includes 20 wire nib pyrography tips in varied shapes, 2 wood pieces, 2 spare...
- The temperature is adjustable from 482 to 1382°F (250 to 750°C), and the temperature value is...
- Our pyrography wood burning kit comes with an integrated holder design, making our main unit super...
List of Beginner Pyrography Project Ideas & Wood Burning Ideas
This list of wood burning project videos is a great place to start if you are a beginner! Each video tutorial includes detailed audio or visual instruction and tips for which types of materials and tools to use. Follow the directions exactly, or add your own flair.
1) Wood Burning Cutting Board
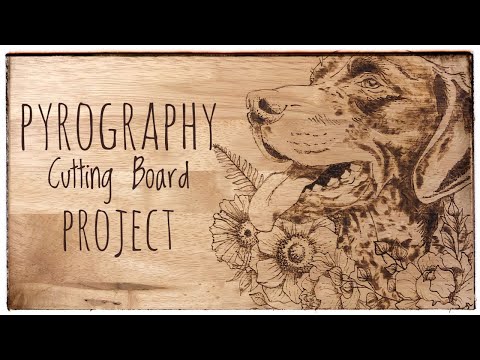
Cutting boards make great gifts and are necessary to have in any kitchen. To start making a wood burned cutting board, trace your design onto the surface in whatever configuration suits your design.
The artist in the video uses a dog pattern and places it in the right corner of the cutting board, but you can use any design you like and choose to center or off center it as you see fit.
Once the pattern is transferred onto your burning surface, use a line work pen tip to burn the basic outline of the pattern. Fill in the design with a shader tip and add details based on the natural shadows and contours of your pattern.
2) Dragonfly Board
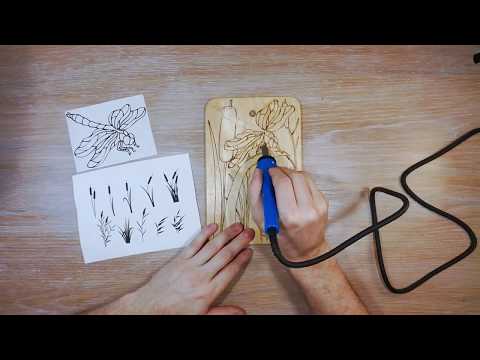
For this project you will need a small board and a dragonfly pattern. A similar pattern can be found online on etsy.com or through other art suppliers. You can also freehand draw your design.
The artist in the video combines two stencils, so there is no right or wrong way to get your project started. Once the pattern is on the wood, burn all the line work with a line tip.
Use a shader tip to apply shading where you would like. For a colorful finished project, fill in your design using colored pencils and seal in the color with a clear finishing product.
3) Floral Eggs

This project requires wooden eggs, which can be found at art supply stores or online. The artist recommends working the floral pattern free hand to make unique designs and shapes. She begins by burning a small circle with a line tip, and then makes petals around the circle.
She continues to add overlapping flowers on the egg and rotates the egg and the pyrography pen as she works to make line work easier. This project is great for practicing line work and can be sold in art shows.
Throughout the process, the artist keeps her pen heat high to make the project easier and faster. If you would like to add color to your wood burning, you can fill in the flowers with watercolor paint. Finish with a clear gloss to add shine and protect the paint.
4) Basic Moose

Start this project with a light-colored, square board. The artist uses bamboo, but any light wood will work. Free hand draw or use a stencil to apply a moose outline onto the board. Use a knife tip or other flat edge tip to create the lines of the moose.
Once your outline is burned, use a basic lighter to fill in the moose body. You can also use your pyrography pen and a shader tip, but a lighter will get the job done faster.
5) Wood Burning Spoons

Wood burned spoons make a great gift for the cook in your life, and can be easily sold at art shows. In this tutorial, the artist transfers word stencils into the bowls of the spoons.
Once the main lettering work is complete, the artist free hand burns small shapes and designs into the necks and handles of the spoons.
6) Wood Burned Leaves Pattern
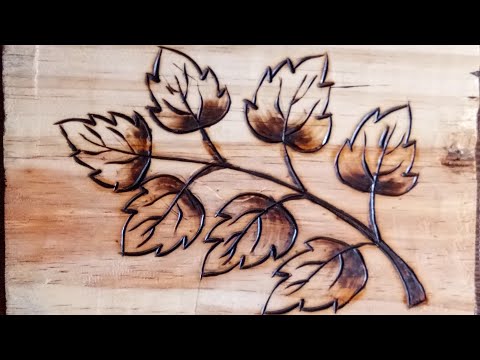
This simple leaf pattern is the perfect way to practice simple line work and shading. Sketch a leaf and stem design onto a piece of your favorite wood. This can be traced from a stencil or hand drawn.
With a pointed wood burning pen tip, trace the stem of the leaves first and then each vein of the leaves. Trace the outline of each leaf, taking your time to ensure even lines.
Add shading to each leaf as shown in the video to give your design more depth. You can add shading to the veins and stems of the leaves as well if you prefer.
7) Pyrography Porch Sign

This project uses pine or poplar wood in any size. Begin by sanding the wood down with 120 grit and 220 grit sandpaper to remove any imperfections and to smooth the surface.
Choose a template discussed in the video or your own favorite design. Make any necessary edits in Photoshop or a similar program.
Then print out the design and attach it to your wood board over carbon paper. Trace the design with a pencil and remove the stencil and carbon paper.
Using a straight-edge pen tip, outline each element of the design. This will ensure that the outlines are neat and crisp. Fill in the letters and shapes using different textures.
Get creative making up your own textures using different pen tips. You can also use a shader tip if you want a smoother look that takes less time.
Add color to the sign using acrylic markers. These are easy to use and blend together. Combine different colors to create shading.
The final step of this project is to apply an outdoor varnish.
8) Free Hand Mountain Ornament

This is a great first-project for those new to wood burning free hand. You will need a small round ornament of any wood you prefer. Aspen is used in the tutorial.
Work on the foreground first and then the background. This is helpful advice for any free hand wood burning design. Make small pine trees in the foreground. You can follow the tree placement in the video or place your trees any way you like.
Make smaller trees to create a bit more depth to the image. Then use an S shader pen tip to create the first mountain. Choose where you want your light to come from and shade the mountain on the side furthest from your light source. Repeat on the other side of the ornament to create two mountains.
Fill in any empty spaces with more shading as desired. You could also add more trees, water, or animals. The tutorial mentions painting in the sky, but you could also shade it with your pen tip if you prefer.
9) Free Hand Pine Tree Design

Practice your free hand wood burning with this easy pine tree design. Work on a slice or pine or similar light wood. Begin drawing a straight line through the center of the wood slice for the tree trunk.
For this design, work from the top of the tree down. Make small branches at the top of the trunk that are diagonal and pointing upwards.
Make longer branches as you work down the trunk. Add downward lines from each branch to create smaller branches and needles. Add shading to the branches as shown in the tutorial.
Shade the trunk to match the look of the larger branches, and shade in any areas that need fill out. Make long curved branches at the bottom of the trunk and repeat the previous steps to fill in the new branches.