
Messing around with epoxy resin opens up a ton of ways to make things that are both practical and actually cool to look at. Whether you want to try your hand at home décor, personal accessories, or even functional furniture, you don’t need to be some expert. Epoxy’s just super versatile, tough, and honestly, you can use it for almost any creative project that pops into your head.
Here’s a list of 30 projects that show off how epoxy resin can work for everyday stuff. There’s a mix of ideas, from small decorative bits to bigger statement pieces, so you can pick whatever fits your vibe (and your space).
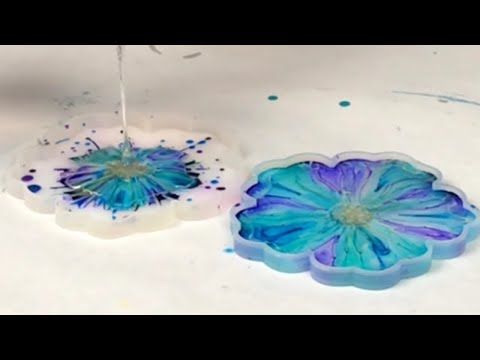
1) Epoxy Resin Coasters with Embedded Flowers

Plain coasters get a serious upgrade when you embed dried flowers in clear epoxy resin. Silicone molds make it easy to keep everything the right shape, and the resin gives that slick, shiny finish that keeps the flowers safe.
Just arrange your pressed or dried flowers in the mold before pouring the mixed resin. Pouring slow helps keep bubbles out and stops the flowers from floating around.
Once the resin’s set, pop the coasters out and sand down any rough edges. You end up with sturdy coasters that have a little bit of nature frozen inside.
2) Geode Style Epoxy Resin Trays

Making a geode tray is pretty fun. Just pour epoxy resin into a mold that looks like a stone slice. Add some metallic powders, alcohol inks, or glitter for those crystal vibes.
You can drop actual crystals or stones along the edge before the resin cures for more depth. Jewel tones like blue, purple, or green? Always look good.
Don’t go too thick with the layers or the tray gets heavy. When it’s cured, you’ve got a tray that’s sturdy enough for serving but honestly looks good just sitting on a shelf.
3) Custom Epoxy Resin Jewelry Pendants

Making your own pendants out of epoxy resin is a solid way to get something unique. Mix in dried flowers, glitter, or tiny charms. The resin sets clear and glossy, so whatever you put inside really stands out.
Prep a mold or a pendant frame, mix up your resin, and pour it in, trying to keep bubbles to a minimum.
Let it cure, and you’ve got a one-of-a-kind piece ready for a chain or cord. Makes a great gift, too.
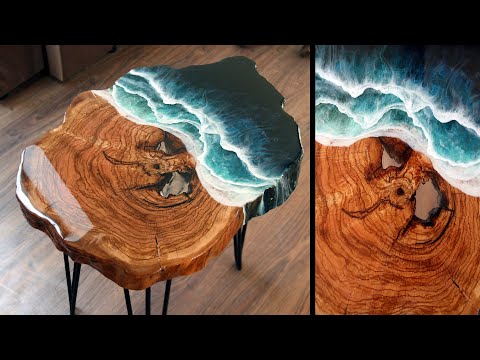
4) Wood and Epoxy Resin River Tables

River tables are always eye-catching. Put two live-edge wood slabs side by side and fill the gap with tinted or clear epoxy. It ends up looking like a river runs right through the table.
Cut and prep your slabs, build a mold to keep them in place, and seal the wood so you don’t get bubbles. Mix your epoxy and pour it in layers to fill the whole gap.
Take off the mold when it’s set, sand the surface until it’s smooth, and finish with an oil or clear coat. Attach some legs and you’re done.
5) Epoxy Resin Phone Cases with Glitter

If you want your phone case to stand out, try using epoxy resin mixed with glitter. It’s a simple process and you can mess around with all kinds of colors and textures.
Grab a clear case or a mold, mix your resin, and toss in some fine glitter (it spreads out better than chunky stuff).
Pour it into the mold or coat the case, then wait for it to harden. What you get is a shiny, tough case that’s way more fun than anything you’ll find in a store.
6) Embedded Shell Epoxy Resin Paperweights

Making a paperweight with little seashells in clear epoxy resin is a nice way to keep a beachy vibe on your desk. The shells stay visible, and the resin gives them a glass-like finish.
Mix up your epoxy and pour a thin layer in a silicone mold. Place the shells so you can see them from all sides.
After that first layer sets, add more resin to fill the mold. Once it’s all cured, pop it out and you’ve got a sturdy paperweight that feels like a souvenir from the shore.
7) Colorful Epoxy Resin Keychains

Keychains are a fun little project with epoxy resin. Use silicone molds and a small batch of resin, then mix in pigments, glitter, or even broken crayons if you’re feeling bold.
Layering different colors can make cool patterns. Some people throw in dried flowers or foil, too.
When it’s cured, just add a keychain ring and you’re good to go. These small projects are perfect for playing around with new color combos.
8) Epoxy Resin Serving Bowls with Metallic Swirls

Serving bowls made with epoxy resin and metallic powders look super modern. The powders catch the light and give off a shifting, reflective effect.
Pour two or more colors at once and swirl them together for soft, floating patterns. The finished look is always a bit of a surprise.
Silicone molds help keep the shape right, and sanding/polishing after curing makes the bowl smooth and shiny.
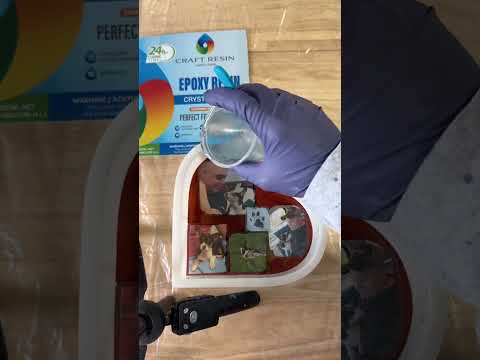
9) Photo Embedded Epoxy Resin Paperweights

Take a regular resin paperweight and make it personal by embedding a photo inside. It’s a nice way to keep a memory right on your desk or shelf.
Pick a silicone mold that fits your photo. Seal the photo with clear tape or a laminating sheet so the resin doesn’t mess it up.
Mix your resin, pour a thin layer, then add the photo. Cover with the rest of the resin, let it cure, and you’re done.
10) Epoxy Resin Desk Organizers

Desk organizers are easy to make with epoxy resin. Just pour it into silicone molds shaped like trays or cups. It’s a sturdy way to keep your workspace neat.
Add pigments or glitter to match your setup, or stick with clear resin if you like things simple.
Wood or metal accents can make the organizer stand out. You get to pick the size and shape, so it actually fits your desk.
11) Glow-in-the-Dark Epoxy Resin Ornaments

Ornaments that glow are just cool. Mix epoxy resin with glow powder or pigment, and the resin spreads it out evenly so the ornament charges in the light and glows in the dark.
Use molds shaped like stars, spheres, or snowflakes for variety. They look clear during the day, but once the lights go out, you get a soft glow.
Throw in a little glitter or crushed shell for texture. You can tweak how bright they get by adding more or less pigment.
12) Epoxy Resin Wine Bottle Stoppers

Wine bottle stoppers are a fun way to use epoxy resin. Grab simple molds and stopper bases, mix your resin, and pour it in. You can add pigments, glitter, or tiny objects to customize them.
When it’s cured, attach the resin piece to a metal or cork stopper base. Most people use threaded studs or screw-in fittings to keep it secure.
Go with clear resin, or mix in whatever colors or sparkly bits you want. These make great quick gifts or just a nice touch for your own kitchen.
13) Marbled Epoxy Resin Countertop

Pouring tinted epoxy resin in swirling patterns can give your countertops that look just like marble. White, gray, and black pigments are classic for that stone effect.
Layer the colors while the resin’s still moving for soft, realistic veining. Using a heat gun or torch helps blend everything together.
Stick these panels on your wall for a durable, bold decoration. You can make them as small or as big as you want – totally up to you.
14) Epoxy Resin Jewelry Dishes

Making jewelry dishes out of epoxy resin is actually pretty fun and the results are both useful and cute. They’re great for tossing your rings, earrings, or keys onto your dresser or desk – no more frantic searching.
You’ll want to mix up your resin following the package instructions and pour it into a shallow silicone mold. If you like things a bit extra, try tossing in some pigments, a sprinkle of glitter, or even dried flowers. Each dish turns out a little different.
After the resin sets, you can sand the edges if you want them perfectly smooth. These are quick to make and honestly come in handy as little organizers.
15) Epoxy Resin Bookmarks with Dried Leaves

Bookmarks made with clear epoxy resin and pressed leaves are simple but look really pretty. The resin keeps the leaves looking fresh and gives the bookmark a nice, smooth feel.
Before you start, give your silicone mold a quick wash so you’re not trapping any dust. Carefully mix your resin and hardener, pour a thin layer, and then gently place your dried leaves.
Once you add another layer of resin to seal everything in, use a heat gun or lighter to pop any bubbles. After it cures, you’ve got a sturdy bookmark with a bit of nature inside.
16) Epoxy Resin Chess Sets
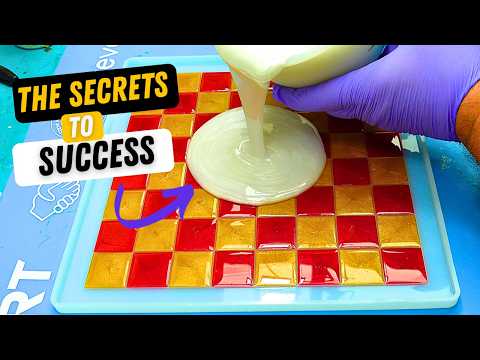
Ever thought about making your own chess set? Resin molds make it pretty easy to get crisp shapes and details. You can go with clear resin, add a tint, or even mix in swirls, stones, or shells if you’re feeling creative.
A resin chessboard looks cool with wood, but you can also make the whole thing out of resin for a slick, seamless vibe. Pigments or metallic powders can make each square stand out.
Lost a piece? No sweat. Just pour a little more resin in the mold and you’ve got a new one ready to go.
17) Epoxy Resin Coated Wooden Cutting Boards

Plain wooden cutting boards get a serious upgrade with an epoxy resin coat. The finish is glossy, seals out moisture, and just makes the board feel way more solid.
Definitely pick a food-safe resin for this. Some resins look awesome but aren’t meant for anything that touches your lunch.
Good airflow and gloves are your friends here. Once the resin’s cured, your board will be tough, shiny, and ready to handle kitchen messes.
18) Abstract Epoxy Resin Canvas Art

Pouring tinted epoxy onto a canvas is a pretty chill way to make abstract art. The resin flows and blends on its own, so you don’t have to fuss too much to get a cool, glossy finish.
Mix in some pigments, inks, or powders if you want to play with different looks. You can swirl them together or keep the colors apart for more contrast.
Try tilting the canvas around to guide the resin, as sometimes the best results come from just letting things happen.
19) Epoxy Resin Drawer Pulls and Knobs
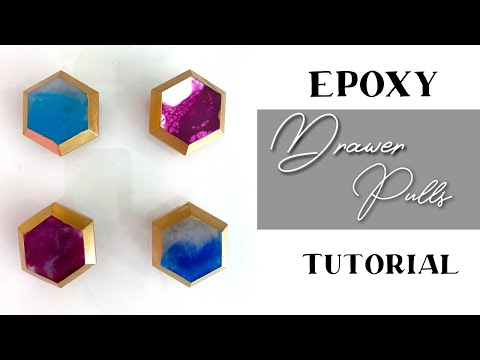
Custom drawer pulls and knobs? Epoxy resin makes it possible and you don’t have to settle for whatever’s on the shelf. Just grab some molds and you’re set.
Try dropping in shells, dried flowers, or little charms before the resin cures. It’s a nice way to make each knob different.
Once the resin hardens, attach your hardware. Just make sure everything lines up. A bit of sanding and polishing, and your new handles are ready to install.
20) Epoxy Resin Embedded Pet Memorials
Epoxy resin is a gentle way to keep a piece of your pet close, whether that’s a bit of fur, ashes, or a favorite photo. The clear resin keeps everything protected and easy to see.
People often make these into jewelry, keychains, or little decorations. Silicone molds come in all shapes, so you can pick something that feels right.
If you want, add a touch of pigment or some glitter, but you can also keep it simple and let the memory stand on its own.
21) Epoxy Resin Garden Stepping Stones

Garden stepping stones get a major upgrade when you coat them with epoxy resin. Concrete molds work great for shaping, and the resin keeps pebbles, glass, or marbles stuck in place and looking shiny.
Getting the resin and hardener ratio right is key, otherwise, things get sticky or cloudy. Once you pour it, the resin levels out and seals everything up.
Pigments or glow powder can give your stones a little extra pop. They’ll hold up against the weather and keep their details sharp.
22) Epoxy Resin Decorative Trays with Gold Leaf

Resin trays get a serious style boost with gold leaf. Those shiny bits catch the light and make the whole tray look fancy, but it’s actually pretty easy.
Just mix your resin and pour a thin layer in the mold. When it starts to set up a bit, drop in the gold leaf wherever you want.
Seal it all in with another layer of clear resin, and you’ll have a tray that’s smooth, easy to wipe down, and pretty enough to leave out.
23) Epoxy Resin Resin Bugs and Insect Models

Preserving insects in epoxy resin turns them into cool display pieces. The clear finish shows off all the details and keeps them safe.
Make sure the insect is totally dry first – some people use alcohol to sanitize, then let it air dry so it doesn’t get weird later.
Carefully place the bug in your mold and pour the resin slowly to avoid bubbles. After curing, you’ve got a solid piece for display, teaching, or even jewelry.
24) Epoxy Resin Embedded Coin Displays

Turning spare coins into a display with clear epoxy resin is a neat way to show off your collection. The resin locks in each coin and gives everything a smooth, shiny finish.
Lay your coins out in a mold or tray, making sure they’re clean and dry. Pour the resin and they’ll stay right where you put them, visible from every angle.
Works for collectible coins, travel keepsakes, or just change you want to remember. The finished block can be wall art, a desk display, or whatever you want.
25) Epoxy Resin Hair Clips with Colorful Inclusions

Hair clips get a big personality boost when you make them with epoxy resin. Molds shaped for barrettes or claw clips give you a solid start.
Sprinkle in dried flowers, glitter, or tiny beads before the resin cures for a colorful look. These details stay suspended and each clip has its own vibe.
Once the resin’s set, just glue on the metal clip backs. You’ll have a sturdy accessory that’s perfect for everyday wear or as a little handmade gift.
26) Epoxy Resin Floating Candle Holders

Floating candle holders made from epoxy resin are surprisingly easy. Pour the resin into shallow molds, leaving just enough room for a tea light or small candle. When it’s done, the clear base keeps the candle steady on water.
If you want to jazz it up, add pressed flowers, glitter, or shells – just make sure everything is sealed inside so it doesn’t mess with the flame.
Good ventilation and careful measuring help things go smoothly. Once cured, these holders are tough, reusable, and easy to clean.
27) Epoxy Resin Embedded Feather Coasters

Natural feathers look awesome when you set them in clear epoxy resin to make simple but eye-catching coasters. The resin holds the feather in place and gives a glossy, sturdy finish.
Pick feathers that are nice and clean. Drop them into the coaster mold, pour the resin in slowly, and try not to trap too many bubbles.
Let it cure completely before popping the coaster out. You’ll have a smooth, durable piece that shows off the feather and keeps your table safe.
28) Epoxy Resin Bowls with Metallic Pigments
Making resin bowls is actually pretty simple, you can grab a basic mold or even just use a balloon as the form. Once everything’s set up and cured, you’ll get a bowl that’s surprisingly sturdy and smooth, perfect for tossing on a shelf or using lightly.
Metallic pigments really bring these bowls to life. Just toss some powder or flakes into your resin mix and you’ll get these wild swirls of gold, silver, or copper. The reflective look is hard to mess up and always catches the light in cool ways.
Try playing around with how you layer the colors. Sometimes a quick swirl of pigment over a clear base gives you these soft, interesting patterns that look way more complicated than they really are.
29) Epoxy Resin Tabletop with EmbeddedAccents
Ever wanted a table that’s just a little more personal? You can seal a map right under a clear coat of epoxy resin and end up with a one-of-a-kind tabletop. It works for coffee tables, desks, even a small dining table if you’re feeling bold. The resin keeps the map safe and gives everything a nice, glassy finish.
First, sand and clean your wood surface so the resin sticks. Lay your map flat, smoothing out any wrinkles or air bubbles – seriously, take your time here. Pour the resin slowly to keep bubbles from popping up.
Once it’s cured, you get a super practical table that also shows off your favorite spots. It’s a fun way to sneak a bit of personality into your space without losing any function.
30) Epoxy Resin Decorative Wall Clocks

Making a wall clock with epoxy resin is actually pretty fun. You start with a wood base or even a silicone mold, then mix up the resin and get creative. People love tossing in colors, metallic powders, or random little objects, whatever suits your mood. Just grab a basic clock mechanism and you’re good.
Try mixing resin with wood slices, stone chips, or those dreamy ocean-inspired pours. The vibe is all up to you – go wild or keep it mellow!
A clear resin layer on top gives you that slick, glassy shine. Not into shiny? Sand it down and go for a matte finish with a bit of sealant.