Cedar planks are pretty awesome as they’re strong, reliable, and just as good inside as they are out in the yard. The wood naturally resists moisture and bugs, so it’s a smart option for furniture, storage, or even just a cool-looking accent piece. You get practical stuff and that clean, natural vibe – a win-win!
There’s a surprising number of ways to turn cedar into something useful or just plain nice to look at, and you don’t need to be a woodworking pro. Whether you’re after storage, a bit of furniture for the patio, or some simple wall art, cedar’s flexibility makes it easy to whip up something that actually fits your style.
1) Cedar Wood Garden Bench

Building a basic garden bench from cedar planks is easier than you might think. Cedar shrugs off moisture and bugs, so it’s a solid choice for outdoor seats.
Just cut your planks to length and screw them onto some strong supports; 2x4s or chunky posts work fine. You don’t need fancy tools, just a saw, a drill, and some screws.
Go simple with a flat seat and back, or throw in some angled cuts if you want it comfier. Sand everything down, and if you’re into the natural look, leave it unfinished.
2) Rustic Cedar Planter Boxes

Cedar planks make planter boxes that can handle the outdoors without rotting out in a year or two.
Cut your boards, fasten everything with stainless screws or nails, and maybe add some waterproof glue. Keeping it simple lets the wood’s natural texture shine.
Want them taller? Stack the boards up. More into a modern style? Use pickets with tight, neat lines.
3) Cedar Wood Outdoor Dining Table
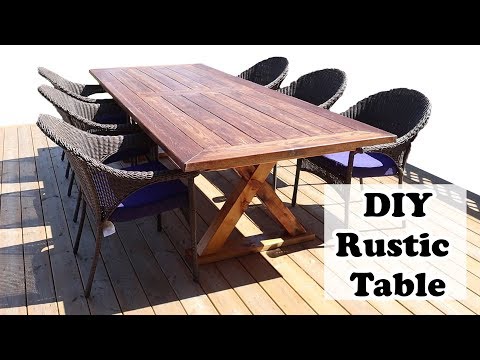
A sturdy outdoor dining table made from cedar planks isn’t too tough to pull off. Cedar’s not fussy about rain or bugs, so it’s a great pick for backyard meals.
Cut your boards for the tabletop and frame. Rectangular is classic, but you could add an umbrella hole or even a little planter section if you’re feeling creative.
Sand it down and slap on a weather-resistant sealant to keep it looking good.
4) DIY Cedar Fence Picket Screen

A privacy screen out of cedar fence pickets is pretty budget-friendly and holds up well outside. The boards are cheap, easy to cut, and don’t mind the weather.
Tack the pickets onto a simple frame, both 1x2s or 2x2s are fine. Go with a straight pattern or try chevron for something different.
Keep the gaps even so it looks tidy. A coat of outdoor sealant or paint helps it last longer.
5) Cedar Wood Accent Wall

A cedar accent wall can totally change up a room. The grain and color add a lot of warmth without much extra effort.
Bedrooms, living rooms, entryways – cedar planks fit just about anywhere. Horizontal installation feels classic, but vertical can be cool too.
Reclaimed boards or tongue-and-groove planks both work. With some basic tools and a bit of patience, you’ll end up with a wall that stands out.
6) Cedar Wood Birdhouse

Making a birdhouse from a single cedar fence picket is quick and satisfying. Cedar’s weather resistance means you don’t have to fuss over sealing it.
Cut panels for the sides, front, back, and roof. Pop a little round hole in the front for the birds.
Mount it on a post, tree, or even a wall; screws or wire both work. You can leave it raw for that rustic look, or stain or paint it if you want.
7) Cedar Wood Serving Tray
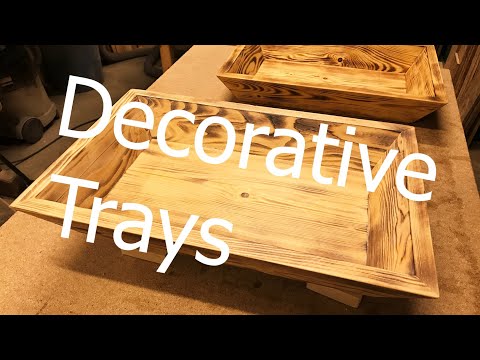
A cedar serving tray is a quick project, and it looks great thanks to that natural grain. Works just as well in the kitchen or out on the patio.
Cut your boards to size, nail or screw on some short sides, and add handles if you want, but this is totally optional.
Give it a light sanding and finish with something food-safe to protect the wood and show off its color. Super handy for everyday use.
8) Cedar Wood Wall Art Sign

Leftover cedar planks are perfect for a wall art sign. The grain and color do most of the work for you.
Cut the boards to whatever size fits your space, then arrange them however you like – chevron, straight, or staggered. Sand the edges a bit to avoid splinters.
Attach everything to a backing board or frame for stability. You could leave the wood as is, stain it, or paint a few sections for some extra flair.
9) Cedar Wood Adirondack Chair

A classic Adirondack chair made from cedar planks is an outdoor staple. Cedar stands up to rain and sun, so you won’t be rebuilding it every year.
Cut boards for the seat, back, and those wide armrests. There are plenty of free plans online that break it down step by step.
Smooth out the rough spots so it’s comfy. If you like the orangey color, use an outdoor finish; otherwise, let it fade to gray naturally.
10) Cedar Wood Storage Chest

A cedar storage chest is a straightforward project, and it’s perfect for keeping clothes, blankets, or keepsakes safe from bugs.
Build a basic box and add a hinged lid for easy access. Most DIY plans just use standard cedar boards.
Want it to last even longer? Line the inside with solid cedar panels. It looks good and helps protect whatever’s inside.
11) Cedar Wood Coffee Table

A cedar coffee table is easy to build and doesn’t require any fancy tools. The wood won’t rot easily, so it works indoors or out. Also, it’s not super heavy, which makes moving it around less of a hassle.
Cut your planks to size, sand them smooth, and build a basic frame with cross supports for strength. The grain gives it a fresh, natural vibe.
Top it off with a clear sealant to keep moisture out. That way, the table stays looking sharp and doesn’t need much maintenance.
12) Cedar Wood Swing Seat

A swing seat from cedar planks, some rope, and a few tools is a fun little project. Cedar resists rot, so you don’t have to worry about it falling apart in the rain.
Cut a plank to the size you want, sand the edges, and drill holes at the corners for the rope. Make sure they’re spaced evenly so you don’t end up with a wonky seat.
Hang it from a sturdy branch or support frame with strong rope or chain. Double-check your knots and hardware before anyone hops on.
13) Cedar Wood Coat Rack

Putting together a coat rack with cedar planks and some hooks is about as simple as it gets. Cedar’s resistance to moisture keeps it from warping, which is handy near doors.
Cut your planks to the length you want, sand the edges, and screw on the hooks. A clear finish makes the color pop and helps protect the wood.
Mount it into wall studs for strength. If you’re into rustic, leave the wood a little rough and let the grain do the talking.
14) Cedar Wood Candle Holders

Cedar planks make for sturdy and good-looking bases for candle holders. You can chop them into chunky blocks, drill out spots for tealights, or just shape them into straightforward stands for tapers. The grain’s always unique, so every piece turns out a little different and has that warm, rustic vibe.
Honestly, you don’t need much more than a saw, drill, and some sandpaper to get going. If you leave the wood raw, you’ll notice the cedar smell every time you light a candle, though a sealant keeps it looking nice longer.
These holders look great on tables, mantels, or even outside on the patio. They’re quick projects that barely use any wood – perfect for scraps you don’t want to toss.
15) Cedar Wood Mail Organizer

A simple mail organizer made from cedar planks is a handy way to stop mail and papers from taking over your kitchen counter. Cedar’s pretty tough, so it holds up to daily use.
Just cut a few boards to the same length and stack them up for slots. You can hang it on the wall or just let it sit on your desk.
A light finish or clear coat keeps the wood looking good and adds a bit of protection. The whole project’s practical and doesn’t eat up much time or lumber.
16) Cedar Wood Herb Drying Rack

A cedar herb drying rack is about as simple as it gets and keeps your garden harvest from turning into a mess. Cedar shrugs off rot and bugs, which is kinda perfect for kitchens or garden sheds.
Slice up some thin slats, nail or screw them into a frame, and add a few hooks or some string to hang your herbs.
Stick the rack somewhere dry and breezy. The cedar keeps things sturdy, and your herbs dry out evenly without much fuss.
17) Cedar Wood Bookshelf

Building a cedar bookshelf is doable with just a handful of planks and basic tools. Cedar’s light but strong enough for books, so it’s a practical pick for small or medium shelves.
Cut your boards to whatever size you need, then screw or pocket-hole them together. The wood grain pops on its own, so you can skip heavy finishes.
Raw cedar gives a rustic feel, but if you’re into smoother vibes, just sand and seal it. You can knock this out in an afternoon, honestly.
18) Cedar Wood Picture Frame

Leftover cedar planks are perfect for a quick picture frame. All you really need is a saw, some glue, and a couple of clamps. Cedar’s color and grain make the frame look good without much effort.
You can size it for any photo or art you want to hang. Cedar’s pretty soft, so you won’t struggle to cut it, even with basic tools.
If you want the frame to feel a bit more polished, sand the edges and slap on a clear sealant. It’ll help the wood stay fresh and last longer.
19) Cedar Wood Side Table

A cedar side table is a fun build and works inside or out. Cedar shrugs off moisture and decay, so it holds up better than most woods if you stick it outside.
Start with a flat top made from joined planks, then add some simple legs. If you’re in a hurry, keep it basic; if you want it sturdier, add cross braces.
Letting the wood weather turns it a silvery gray, but a clear finish keeps that warm cedar color around longer. Either way, it’ll be tough enough for daily use.
20) Cedar Wood Pet Bed

Making a pet bed out of cedar planks gives your dog or cat a cozy spot that actually lasts. Cedar’s naturally bug- and moisture-resistant, so you won’t have to worry about the bed falling apart.
Put together a simple frame with cut planks, then add a plywood or slatted base. Definitely sand the edges, as no one wants a splintery pet bed.
Pop a cushion or mattress inside and you’re done. It’s durable, looks nice, and your pet will probably love it.
21) Cedar Wood Wine Rack

A simple wine rack made from cedar planks just looks good and does the job. Cedar’s not bothered by moisture, so your bottles are safe.
Chop the boards to the same length, add cross supports, and you’ve got rows for bottles. Even a small rack fits several bottles without hogging space.
For a rustic feel, leave the wood raw. If you want it smoother, sand and seal it. Either way, it’ll last a good while and look sharp.
22) Cedar Wood Porch Swing

A porch swing from cedar planks? Classic. Cedar handles the outdoors like a champ since it’s not fazed by rot. All you really need is a basic frame, some slats, and strong chains.
The wood’s pretty lightweight, so moving it around while you’re building isn’t a pain. You can curve the backrest with a jigsaw for extra comfort or just keep it straight.
When it comes time to hang it, use heavy-duty hardware and make sure it’s secured to something solid. No one wants a surprise crash mid-swing.
23) Cedar Wood Garden Trellis

A cedar trellis gives climbing plants something sturdy to grab onto and adds some structure to your garden. Cedar’s not bothered by rot, so you can stick it outside and mostly forget about it.
Cut the planks to size with a saw, check your corners with a square, and put together a grid or lattice with exterior screws.
Stick the trellis right in the dirt or attach it to a raised bed. Give it a season or two, and you’ll have cucumbers, beans, or roses climbing all over.
24) Cedar Wood Shoe Rack

A cedar shoe rack is a straightforward project if you’ve got a few planks and basic tools. Cedar’s great for this since it resists moisture and bugs, which keeps your shoes fresher.
Just cut the boards to your preferred length and sand the edges. A simple rectangular frame with slats is all you need for a sturdy setup.
You can leave it raw for a natural look or add a clear sealant if you want. Adjust the shelves depending on how many pairs you have lying around.
25) Cedar Wood Window Planter

A simple window box is easy to whip up with some cedar planks and a handful of screws. Just cut the wood to the size of your window, sand it down, and fasten the pieces together.
Mount it outside so your favorite shade plants or herbs are right where you can see them. The cedar grain gives it a nice rustic touch and naturally resists rot without much effort.
This is a great beginner project with basic tools only. You get something handy that actually adds a bit of personality to your home’s exterior.
26) Cedar Wood Wall Shelf

A cedar wall shelf fits just about anywhere and holds up well for everyday stuff. Cedar’s tough and adds a bit of warmth to your space.
Cut the planks to your chosen length, sand them, and attach brackets or side supports. Make sure to mount it into wall studs so it doesn’t sag under weight.
This is a quick project that gives you extra storage. You can leave the cedar unfinished for a rustic style or add a clear coat to make the grain pop.
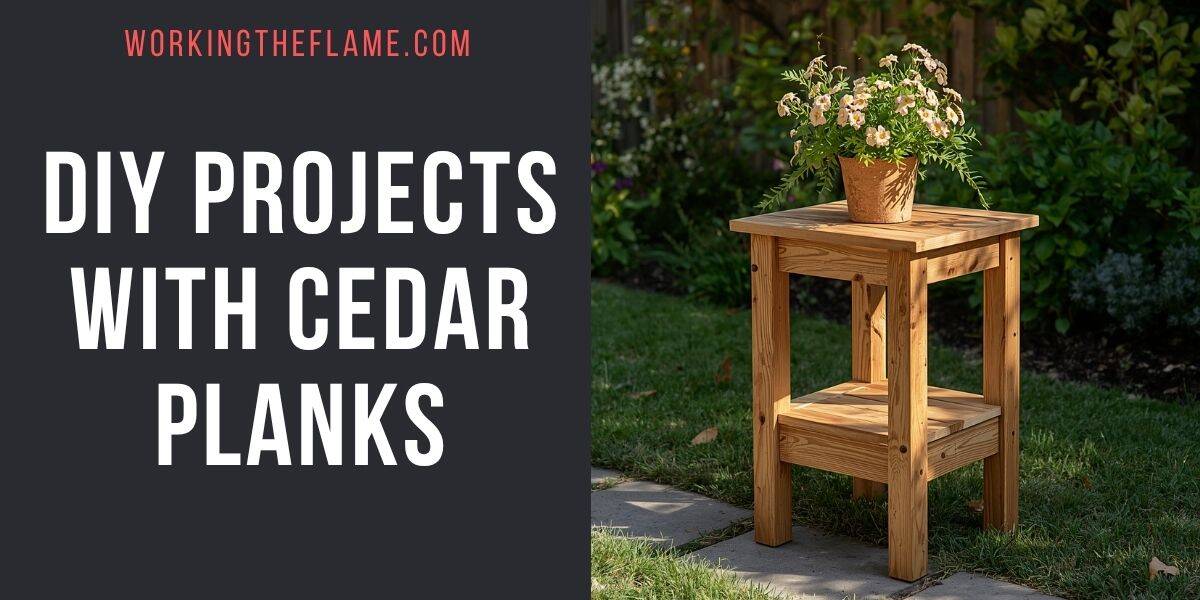
27) Cedar Wood Plant Stand

A sturdy plant stand with cedar planks is a fun little build. Cedar shrugs off moisture, so it’s fine for patios or decks.
Cut four legs to the same length, then add cross pieces at the bottom for stability. The top frame can be square or rectangular, just make sure it holds your planter.
Sand the edges and leave the wood raw, or seal it if you want extra protection. You could finish this in an afternoon, no problem.
28) Cedar Wood Serving Cart

Want a serving cart that actually lasts outside? Cedar’s a great bet since it shrugs off moisture and rot way better than most woods. Makes sense for patios or decks, right?
Start out with a plain frame, nothing fancy. Pop on some shelves or just a flat top, whatever you’re feeling for serving space. Wheels are honestly a must if you don’t want to haul stuff back and forth by hand.
If you’re just getting into woodworking, keep things basic. Toss on a few hooks or maybe a towel bar for extra function, but no need to overthink it.