
You can shape metal into all sorts of useful and creative things with just a handful of basic tools and a bit of practice. Forging is a hands-on way to get a feel for how heat, hammer, and technique all come together. Simple metal projects are a great way to build real skills that can lead to more advanced blacksmithing down the line.
Each project brings a new little challenge, but the steps stay pretty straightforward and satisfying. You’ll go from basic hooks and openers to small, decorative, and functional items that actually look good and do something. By the time you’ve tried a few, you’ll have the confidence to start making your own forged stuff.
1) Simple S-hooks

S-hooks are a classic starting point for blacksmithing because they’re quick, easy, and teach you how to control your hammer. You just need a short bit of mild steel, a hammer, an anvil, and some heat.
Get the steel nice and red hot, then taper both ends and curve them in opposite directions over the horn of your anvil. That’s your “S” shape.
You’ll get a feel for how metal moves and how to bend curves without making a mess of things. These little hooks are super handy for hanging up tools, utensils, or even a plant or two.
2) Wall hooks

Wall hooks are a go-to beginner project. They’re practical, fast to forge, and teach you the basics, such as drawing out, tapering, and bending steel.
Just heat up a small steel bar, flatten one end for mounting, and curl the other into a hook. If you’re feeling fancy, add a little scroll or twist for flair. When it’s cooled off, brush off the scale and rub on a bit of oil to keep rust at bay.
3) Bottle openers

A bottle opener is a fun, quick project you can make with a short piece of mild steel and a few basic tools. It’s a classic starter for practicing tapering, bending, and punching. Plus, you get something you’ll actually use at the end.
Try curving or twisting the handle for a better grip, or add a little texture or your initials for a personal touch. You’ll get to know how metal responds to your hammer, and hey, you’ll have a bottle opener when you’re done.
4) Decorative leaves

Forging small decorative leaves is a nice way to practice shaping and adding texture to metal. They work on their own or as little accents on hooks, handles, or wall art.
Start with a flat bar, taper out the end, and hammer it into a leaf shape. Use a chisel or peen to add veins if you want it to look more realistic.
You’ll pick up better control over your hammer and get a sense for the subtle changes in temperature and how metal moves as you go.
5) Fire pokers

A fire poker is a straightforward project that only needs a steel rod, a hammer, and a forge. It’s a beginner favorite; useful, quick, and a good intro to tapering and shaping.
Try mild or high-carbon steel for something that’ll last. Heat one end and form a point for poking coals, then shape the other into a handle or curl it for a bit of style. You’ll have a tough tool that looks good by the fire.
6) Keychains

Keychains are quick to forge and can still look really sharp. Just grab a small strip of steel or iron, twist it, stamp it, or texture it, then form a loop at one end and add a split ring.
Try out different shapes, such ashearts, leaves, or just simple bars, for hammer control practice. These are great for learning because you don’t waste much material.
Stamped initials or simple designs make them personal and they’re pretty popular at markets since they’re cheap, useful, and easy to carry.
7) Knife blades

Knife forging is surprisingly accessible if you use scrap steel, old files or saw blades usually have enough carbon for a good edge. Using reclaimed metal keeps costs down and gives you plenty of practice with shaping and heat.
Heat the steel to a bright orange and hammer it into a blade shape. Try to keep the edge straight and even as you go. Smaller knives are easier to manage when you’re just starting out.
Once it’s shaped, quench and temper the blade, then grind and polish until it’s sharp and clean.
8) Hooks for hanging tools

You can make sturdy tool hooks from a piece of mild steel and a hammer. Heat one end, taper it into a point, and curve it over the anvil’s horn for a simple J-hook.
Add a twist in the shank if you want a better grip or just a touch of style. Little details like that are great for practicing control and don’t take much extra time.
Hang your finished hooks on a board or beam to keep your tools organized. They’re handy and you’ll get better at hammer accuracy with each one.
9) Small garden trowels

A small garden trowel is a solid beginner project and you don’t need much more than scrap steel and basic tools. Old leaf springs are popular, as they’re tough and easy to shape hot. You’ll learn how to form a blade, shape a tang, and fit a wooden handle.
Draw out the blade and curve it a bit for digging. Taper the tang so it fits snugly into the handle. After a few careful hammer blows and some sanding, you’ll have a simple tool that’s perfect for planting and light gardening.
10) Candle holders

Simple candle holders are easy to forge with mild steel and a few basic tools. Heat the metal, then hammer it into a base and stem to fit a standard candle. Try to keep the design balanced so it stands up straight.
You can twist or bend the stem for extra character. Punch or drill a recess for the candle to sit in. Brush it with a wire brush and finish with a bit of wax for a clean look.
11) Letter openers
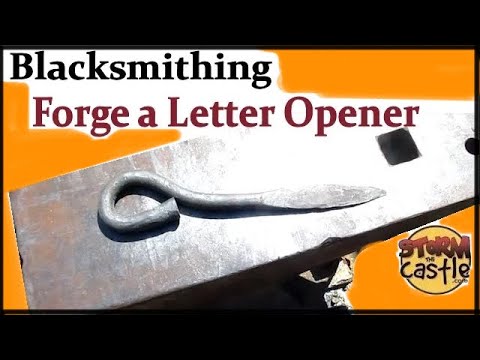
A letter opener is a fun little project you can make with a short piece of mild steel or rebar. It’s good practice for drawing out, tapering, and shaping metal evenly. Plus, it’s quick enough to finish in one go.
Heat the stock up and hammer one end flat and thin for the blade. The other end can stay round or get twisted into a simple handle.
File the edges smooth and add a light polish. A quick oil rub keeps rust away and gives it a nice finish.
12) Plant hangers

A simple plant hanger is a nice little project you can tackle with just the basics: mild steel, a hammer, and some patience. A wall-mounted hook or bracket is usually all you need, and honestly, it doesn’t take long to make one.
Taper one end of your bar, then bend it into a hook – nothing fancy unless you’re feeling creative. If you want to jazz it up, throw in a twist or curl. Drill or punch out the mounting holes before you cool and brush the piece down. When you’re done, you’ll have a sturdy handmade hanger for small plants, inside or out.
13) Trivets

Trivets are one of those practical projects you can finish with just a forge, a hammer, and a bit of mild steel. It’s a great excuse to mess around with bending, twisting, and joining metal, and hey, you’ll actually use it in the kitchen.
Start by making three or four legs from round bar and bend them out a bit for stability. Add a flat ring or crossbars up top to hold hot pans. You can leave the finish raw or brush on some wax for a cleaner look. Trivets make great gifts and they’re easy to sell at craft markets if you’re into that.
14) Napkin rings

Forging napkin rings from mild steel or copper is a fun way to use up little scraps. Just grab some short lengths of round or flat bar, heat them, and wrap them around a mandrel. Smoothing the edges is worth the extra minute so they feel good in your hand.
Since they’re so quick to make, you can crank out a handful in one go. Try out some twists, hammered textures, or even stamped patterns to keep things interesting. They’re practical, they look cool, and people tend to buy them at markets. Not bad for something that doesn’t cost much to make.
15) Door knockers
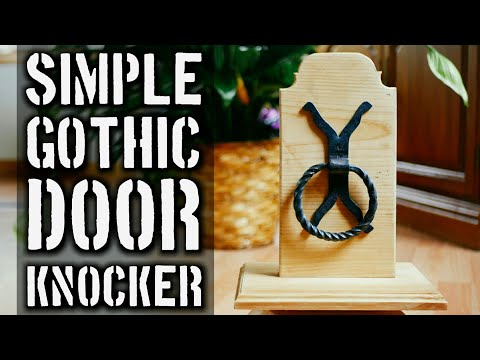
A door knocker is a classic blacksmith project, and you don’t need anything fancy to get started. Mild steel bar stock, a good heat, and some hammer work will get you there. Stick to a simple ring or plate if you’re new – uniform curves and balanced shapes are trickier than they look.
Add a backplate if you want to mount it solidly. Drill or punch holes before you harden the metal, it just makes life easier. A brushed or blackened finish looks sharp and fits most doors.
16) Steel Cross
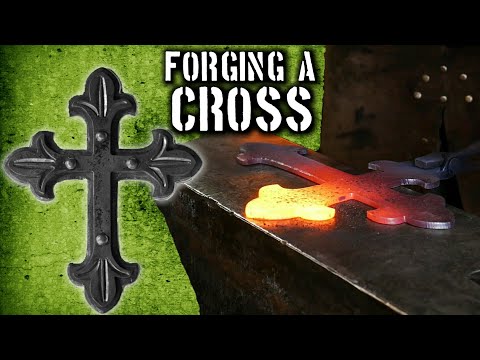
Learn how to forge a metal cross and add unique texture with this simple blacksmithing project – perfect for beginners and great for selling locally or online. Using basic tools and techniques, you’ll shape, taper, and texture rebar or mild steel to create a decorative cross full of character.
Forging crosses is both fun and rewarding, offering endless style variations, from rustic to refined. This project is a great way to practice foundational skills while crafting something meaningful and marketable.
17) Utensil handles

Making utensil handles is a low-pressure way to practice shaping metal into comfortable grips. Just grab a flat bar and hammer away until it feels right in your hand. No need for fancy tools or anything.
Try out a twist or a gentle curve to give each handle a bit of character. Maybe add a scroll or some texture if you’re feeling ambitious. Steel is sturdy, but mixing in brass or copper can look really nice too.
Stick with simple shapes at first. Once you’re comfortable with the process, you can pair your handles with spoons, spatulas, or whatever else you decide to forge later.
18) Decorative nails

Decorative nails are actually pretty fun to make, just grab some small steel rods or cut nails and your basic blacksmith tools. Heat the metal up until it’s glowing red, then shape the head however you like: maybe a square, a little dome, or even a gentle spiral if you’re feeling fancy.
If you want to go a step further, try adding some texture or a twist or two. It’s those little imperfections that give each nail its own personality. They look great as furniture accents or even sturdy hooks for hanging things.