
Messing around with metal lets you make cool, practical stuff while picking up some handy skills. Whether you’re into welding, machining, or just shaping sheet metal, starting small makes things way less intimidating. You get to boost your confidence and actually end up with something useful or just fun to show off.
Simple projects can be anything from useful workshop tools to little decorative bits for your home or yard. Each idea here is a no-nonsense way to practice cutting, shaping, and joining metal, without biting off more than you can chew.
1) Lightweight Camp Saw

A lightweight camp saw is a great starter if you’ve got some flat steel stock and a few basic fasteners lying around. The frame doesn’t eat up much material, so it’s a chill way to practice cutting, drilling, and filing.
Go for a folding design if you want to keep it compact for packing. Shape the frame, toss in a tensioning bolt, and pop in a regular saw blade.
You’ll get the hang of basic joints and hardware, and you won’t need to mess with advanced welding. It’s handy for camping or just knocking out backyard chores.
2) DIY Sheet Metal Box
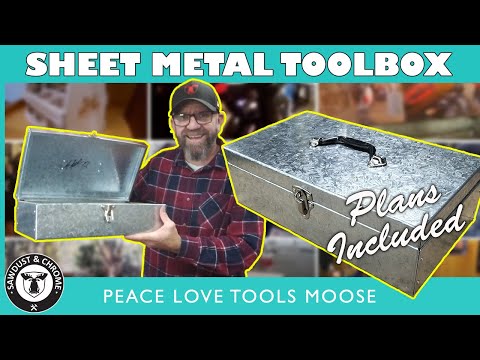
A sheet metal box is about as simple as it gets when you’re just starting out. You’ll practice your cutting, bending, and fastening, and end up with a box for holding all the random bits and bobs in your shop.
Thin-gauge sheet metal is easier to wrangle, so don’t stress about using heavy stuff. Mark your lines, measure twice, and focus on getting those edges nice and straight.
Once you’ve got the box folded up, fasten the corners with rivets, screws, or even a few spot welds if you’re feeling brave. Add a lid or a handle if you want, but honestly, even a plain open box is super handy.
3) Wrought Metal Candle Holder

Turning wrought metal into a candle holder is a classic project. You only need a few tools to bend and twist the metal into curves or spirals, makes for something sturdy and good-looking.
Start with flat bars or rods, heat them up, and hammer away until you get the shape you like. Toss a little dish or platform on top, and you’ve got yourself a candle holder that actually works.
Projects like this are perfect if you’re new to bending and welding. Plus, they make pretty cool gifts or just something to keep around the house.
4) Simple Sheet Metal Bench Shear

Building a basic sheet metal bench shear is totally doable with some patience and a few sturdy parts. You’ll end up with a tool that gives you nice, clean cuts on thin sheet metal.
A homemade shear usually handles up to about 2mm thick. You’ll need to assemble the blades, add a solid handle, and maybe a back gage to help guide your cuts.
Once it’s together, you’ll wonder how you ever managed without it. Cutting strips or small pieces for other projects gets way less annoying.
5) Basic Welding Cart

Dragging your welder around is a pain, so a welding cart is a solid project. Throw together a simple frame from angle iron or square tubing, slap on a flat surface, and add some wheels.
You don’t need to be a pro for this one. Just get your cuts straight and your basic welds strong enough to hold everything together. A handle makes it way easier to move.
If you’re feeling extra organized, add a shelf for cables or safety gear underneath. Saves time and keeps your stuff in one spot.
6) Decorative Metal Wall Panel

Making a decorative metal wall panel is a fun way to mess with sheet metal, aluminum, or just whatever scrap you’ve got. Cut out some simple shapes or patterns – no need to get fancy.
If you want it to catch the light in different ways, try adding texture with a hammer or pressing tool. Makes a big difference in how the panel looks on your wall.
Hang one big panel or a bunch of smaller ones in a grid. Mixing in wood or fabric frames gives it a bit more character, too.
7) Handmade Metal Jewelry

Starting with wire wrapping is probably the easiest way to get into metal jewelry. Grab some pliers and thin wire, and you can wrap stones or beads to make simple rings, pendants, or earrings.
Stamping is another beginner-friendly trick. Press letters, numbers, or shapes into flat metal blanks, and you’ve got personalized charms without much fuss.
Feeling adventurous? Try fold forming – fold and hammer thin sheet metal for cool textures. It’s great for bracelets or pendants if you want something a bit different.
8) Machinist’s Hammer

A machinist’s hammer is a solid pick for your first metal lathe project. You don’t need to be super precise, so it’s a good way to try out turning and fitting parts.
The head can be brass, aluminum, or steel. If you want, add interchangeable tips. A plain steel or aluminum handle works, but you might want to flatten the sides so it doesn’t slip.
When it’s done, you’ve got a tool for light tapping, lining up parts, or making small adjustments on the lathe.
9) Toolmaker’s Vise
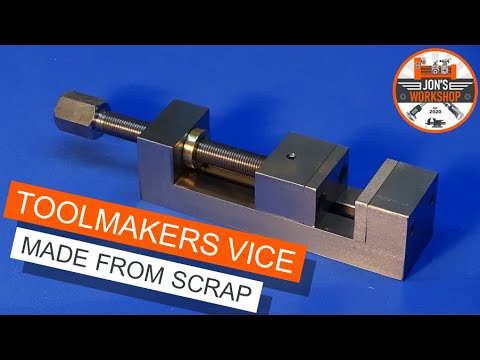
Trying your hand at precision machining? Building a toolmaker’s vise is a great challenge. You’ll get to use milling, grinding, and even heat treating as you go.
Start with a solid steel block, then machine out the jaws, body, and screw mechanism. Keeping things accurate is the tricky part, but it’s good practice for measuring and finishing.
A lot of people make one as a long-term project. Once it’s done, it’s actually super useful for holding small parts when you’re working on other stuff.
10) Micrometer Stand

Ever get annoyed with shaky hands messing up your micrometer readings? A micrometer stand is the fix. It’s a simple build, but it makes measuring way less frustrating.
Most stands are just a solid base with a post or clamp to hold the micrometer steady. You can whip one up from metal scraps, a small vise, or even a heavy block.
You’ll get to practice turning, threading, and putting the whole thing together. Doesn’t take much material, and you’ll probably use it more than you expect.
11) Metal BBQ Grill Frame

Building a simple metal frame for a BBQ grill isn’t too tough. Steel studs or square tubing are solid picks, they’re strong and don’t mind being outside. Just try to keep everything square so your grill sits flat.
Cut your metal pieces to the lengths you need, then either weld or bolt them together. Cross braces help with stability, so don’t skip those. If you want room for shelves or storage, just leave some space for them.
Once it’s all together, double-check that the joints are sturdy and take a grinder to any sharp edges. A quick coat of heat-resistant paint goes a long way to stop rust from creeping in.
12) Go-Kart Frame Fabrication

Making a go-kart frame out of square steel tubing is pretty popular since it’s strong but not crazy heavy. Most DIY builders stick with 1” tubing because it’s easy to cut, weld, and line up.
Lay out the base on a flat surface and tack weld the joints first – this keeps things from twisting before you commit with full welds.
After that, toss on some uprights and crossbars for extra support. Keeping your measurements on point makes life easier when you get to the steering and axles.
Welding isn’t rocket science here, so just take it slow and steady. It’s a good project if you want to get more comfortable with metalwork.
13) Metal Bowls from Scrap

Got some leftover sheet metal or random steel bits? You can whip up some basic bowls with just a few cuts and welds. Trace out a circle, then cut it with a plasma cutter or angle grinder – whatever you’ve got handy.
Heat and hammer the metal to give it a nice shallow curve. Smoothing out the edges with a grinder or welder keeps things from looking too rough.
These bowls are handy for tossing in keys, nuts, or bolts. They’re quick, don’t waste much material, and give you a chance to mess around with shaping and finishing.
14) Slide Hammer

Making a slide hammer is a pretty chill way to get started on the lathe. It’s one of those tools you don’t realize you need until you actually have one for pulling dowels or press-fit parts.
You’ll need a shaft, a sliding weight, and a handle. It’s a good excuse to practice facing, turning different diameters, and maybe threading if you’re feeling adventurous.
Since you don’t have to be super precise with the sizing, it’s more about getting the hang of the machine. When you’re done, you’ll have a tool that’ll see some real use around the shop.
15) Welded Garden Trellis

A welded garden trellis is a great beginner project. Grab some steel rods or rebar, they’re easy to cut and weld. Simple grid patterns are all you need for climbing plants to grab onto.
Stick with square or rectangular frames to keep things easy. Tack welds can hold everything in place while you work your way around with the final welds.
Once it’s sturdy, add a few vertical or diagonal bars if you want extra strength. Hit it with some outdoor paint or rust-resistant spray so it lasts a while outside.
16) Welded Metal Coat Rack

Turning scrap metal or steel bars into a coat rack is pretty straightforward. Weld some hooks or short rods onto a flat bar, then stick that onto a wall plate or a stand. Doesn’t take much time, but you end up with something useful.
Grind or paint over the welds if you want it to look a bit neater. Need more storage? Add a few extra hooks or maybe a little shelf on top. It’s a solid project for practicing your welding and you get a handy rack out of it.
17) Sheet Metal Birdhouse

A sheet metal birdhouse is a fun way to use up some flat panels. Go with a simple cube or box with a sloped roof – it’s easier than trying anything too fancy and still gives birds a safe spot.
Sketch a quick plan, then mark and cut your pieces from thin steel or aluminum. Drill an entry hole in the front, and don’t forget to smooth out any sharp edges.
Once all your pieces are ready, put them together with rivets or a few small welds. Toss on a perch or a hook so you can hang it up in the garden.
18) Welded Metal Picture Frame

Want to whip up a simple picture frame? Grab four metal pieces, weld ‘em together at right angles, and you’re halfway there. Square tubing or even a flat bar does the trick, just cut each piece to fit your photo or whatever you want to frame.
Once the corners are welded, hit those joints with a grinder to clean things up. Some folks like the raw, industrial vibe, but you can always toss on some paint if you’re after a smoother look.
Add a couple of small clips or maybe a backing plate to keep your picture snug inside. It’s a nice little project for anyone wanting to mess around with straight cuts, corner welds, and a bit of finishing work.