
Scrap wood piles tend to pile up faster than you’d expect, but honestly, those leftover pieces don’t have to be wasted. With a little imagination, you can turn them into handy items that actually add some charm to your home or workspace.
Instead of letting all those extra boards and random cutoffs gather dust, why not use them for something useful or even decorative? Whether you need small household items or want to try your hand at some creative storage, these ideas can help you make the most of what’s already on hand.
1) Rustic wooden picture frames

Leftover wood is just begging to become rustic picture frames for any size photo you’ve got. Scrap boards, pallet planks, or even old bits of trim can work. A quick sanding is usually enough, leave some texture for character.
Just cut the wood to size, join the corners with nails or glue, and you’re good to go. If you’re feeling fancy, add a stain or a light paint wash to bring out the grain. It’s fast, cheap, and gives your photos a cozy, handmade vibe.
2) Custom wooden coasters
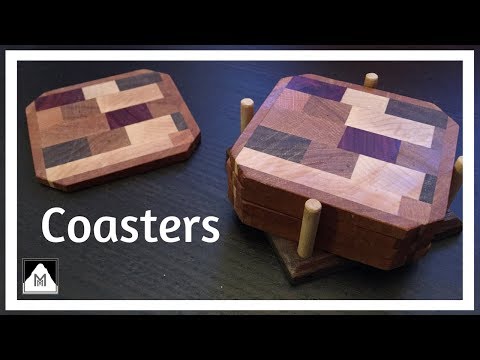
Scrap wood makes great coasters, and honestly, they’re a fun way to use up those tiny pieces. You only need a few inches of wood per coaster. Sand the edges so they don’t scratch your table, as nobody wants splinters with their coffee.
Paint, stain, or woodburn a design if you want something unique. Stencils work, or just leave them plain for a simple look. A clear sealant helps keep water rings away.
These take hardly any time and barely use any wood. Plus, they make solid little gifts for friends (or yourself).
3) Small wooden planter boxes
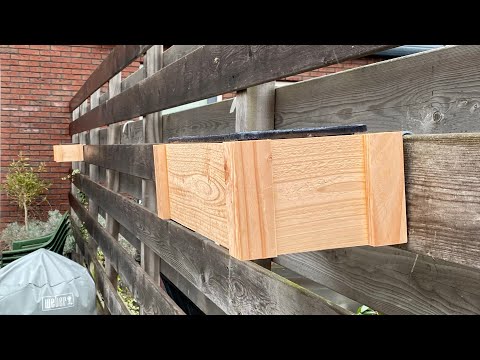
If you’ve got leftover 2x4s or fence boards, why not whip up a few planter boxes? Even those short offcuts can be pieced together for herbs or flowers.
Just cut the boards to size, screw or nail them together, and maybe line the inside with landscape fabric for drainage. Sand down the rough edges and slap on some outdoor sealant if you want them to last outside.
No need to get fancy unless you want to; plain boxes look rustic, or you can paint them to match your patio.
4) Wall-mounted key holders

A chunk of leftover wood and a few hooks and you’ve got yourself a key holder for the entryway. It’s a small project but makes a big difference in keeping things organized.
Mounting it on the wall clears off your counters, and you’ll always know where your keys are. Pallet wood, old 2x4s, whatever you have.
If you add a little shelf above the hooks, you get space for mail or sunglasses too. You can probably finish this one before your next cup of coffee cools off.
5) Wooden candle holders

Scrap wood is perfect for making candle holders. Even tiny pieces can become a sturdy base for tea lights or small pillars.
Cut blocks or slices, then drill out a hole for the candle. Sand the edges, as nobody wants a splintery candle holder.
A little finish or stain can dress them up, or just let the wood grain show for a more rustic feel.
6) Decorative wooden trays

Leftover wood can become simple trays for storage or display. Usually, all you need is a flat base and some short sides. Handles are a nice touch if you want to carry it around.
Use trays to corral clutter on a coffee table or dresser. They make things look organized, even if you’re not. Paint, stain, or line the tray with patterned paper if you’re feeling creative.
Try different shapes depending on what scraps you’ve got – square, rectangle, even a long skinny tray for remotes or keys.
7) Wooden phone stands
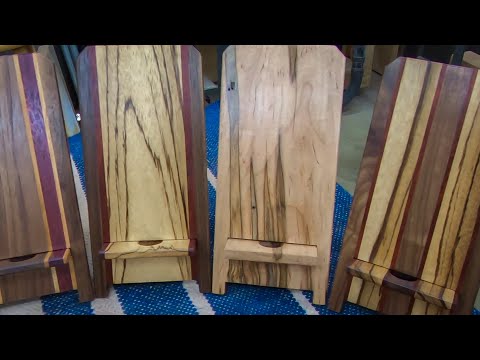
A couple of small pieces of scrap wood and you can make a phone stand in almost no time. Just cut two pieces at the right angle and you’re set.
A flat base and a slotted back piece is all you really need. Adjust the angle for watching videos or just propping your phone up to charge.
Add a notch for your charging cable if you want to get fancy. Sand it smooth and you’re done! Super useful for almost no effort.
8) Birdhouses

If you’ve got scrap boards or old fence panels, why not make a birdhouse? Cut the pieces, nail or screw them together, and make sure there’s an entrance hole sized for the birds you want to attract.
A sloped roof helps keep the rain out, and a few drainage holes in the bottom can’t hurt. You can leave the wood as-is or use a non-toxic stain for a bit more color.
9) Wooden jewelry organizers

Small bits of scrap wood are perfect for jewelry holders to keep your necklaces and bracelets from tangling. Just add some hooks to a flat board and you’re halfway there.
Throw on a narrow ledge for rings or tiny things. Even leftover 1x2s or 1x4s can be cut and arranged into a practical wall rack.
If you’d rather have a standing organizer, attach a few upright pieces to a base and add pegs. It’s simple but gets the job done.
10) Simple wooden shelves

Leftover planks make great shelves, and you can fit them to almost any wall. Grab some brackets, a few screws, and you’re set.
They’re handy for books, plants, or just a bit of extra storage. Leave the wood rough for a rustic look, or sand and paint it if that’s your style.
Scraps come in all shapes and sizes, so don’t stress about matching everything perfectly. Sometimes a mix looks better anyway.
11) Wooden serving boards

Turn your leftover wood into serving boards for snacks, cheese, or bread. Sand the edges and use a food-safe finish, and you’ll have something practical for the kitchen.
Keep it simple or add a handle for carrying. Each wood type has its own grain, so every board feels unique.
A hole at one end makes it easy to hang up when you’re done. It’s a solid way to use up small scraps and reduce waste.
12) Wooden desk organizers
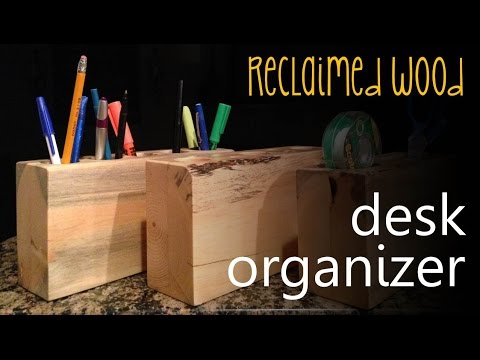
Scrap wood works great for simple desk organizers. A few blocks, some glue or screws, and you’ve got a sturdy spot for pens, paper clips, or sticky notes.
Cut slots or compartments to fit what you actually need. Maybe a shallow tray for paper, or taller sections for markers and scissors.
Throw in a drawer or divider if you want. You can leave it rustic or paint it for a neater look – totally up to you!
13) Wooden wine racks

Leftover wood lying around? It’s honestly perfect for a simple wine rack that keeps your bottles tidy and easy to grab. Usually, you just need a couple of boards, some screws, and a saw, nothing fancy.
If you’re short on floor space, a wall-mounted rack is a smart move. Diamond or grid layouts both work, and you can tweak the size to fit however many bottles you’ve got stacked up.
Not into mounting stuff on the wall? Go for a freestanding rack, just stack short planks with spacers between. It’s sturdy, and you can always add more layers if your collection starts growing faster than you expected.
14) Wooden bookends

Got a pile of wood scraps? They’re just begging to become bookends. Straight cuts make for a clean, simple look, but honestly, it’s fun to shape the edges or corners if you want something a little different.
You can paint or stain them to match your shelves, or just leave the wood bare – sometimes that rustic vibe just works. Heavy blocks or even small logs do a surprisingly good job holding books in place.
If you’re feeling creative, try carving out a geometric pattern or adding a splash of color. With some glue, sandpaper, and a free afternoon, you’ll have a set ready to go.
15) Wooden napkin holders

Small scraps piling up? Turn them into simple napkin holders, no need for fancy tools. Just a few cuts and some sanding, and you’re set.
Mixing different wood types looks surprisingly cool, especially if you’ve got offcuts with contrasting colors or grains.
A quick coat of oil or clear finish helps the wood pop, but if you’re into that rough-around-the-edges look, just leave it bare and let it age naturally.
16) Wooden coat racks

Old boards, pallet scraps, or even a weathered plank can become a simple coat rack with just a handful of hooks and a drill. Don’t worry if the wood’s not perfect, as knots and rough edges actually make it look better, in my opinion.
Mounting it on the wall keeps things tidy, especially if your entryway’s tight on space. Metal hooks give a modern feel, but wooden pegs are always a classic.
Quick tip: just sand down the rough bits, screw in your hooks, and hang it up. Shouldn’t take more than an afternoon, unless you get distracted (which, let’s be honest, happens).
17) Wooden utensil holders

A handful of leftover wood can easily become a simple utensil holder for your kitchen. Cut the scraps to size, glue or nail them into a box, and sand the edges so you don’t get splinters every time you reach for a spoon.
If you want to get a bit more organized, add dividers for spoons, spatulas, or whatever else clutters your drawer. Paint or stain it to match your kitchen, or just leave it as-is if you’re into the natural look.
Even tiny offcuts work for this one. It’s a quick fix for countertop clutter, and honestly, it’s nice not having to dig through a drawer for a whisk.
18) Wooden toy cars

Got leftover scraps? They’re perfect for making simple wooden toy cars – just grab a saw, sandpaper, and a drill. Round off the edges so they’re safe for little hands, and cut wheels from small blocks or use a circle cutter if you’ve got one.
Painting or staining the cars makes each one a bit different. You could keep them plain for a natural feel, or go wild with colors and finishes.
They’re tough enough for kids to play with, but honestly, they also look great lined up on a shelf. Plus, using scraps means you’re not wasting anything.
19) Wooden chalkboards

Leftover wood can easily become a handy chalkboard, just attach a smooth plywood panel to a frame built from scraps. A quick coat of chalkboard paint and you’ve got a reusable spot for reminders, doodles, or whatever else you need.
Cut the frame pieces to fit, sand them down, and maybe stain them if you want a polished look. Throw some hooks on the bottom and suddenly it’s also a place for keys or bags.
Hang it in the kitchen, workshop, or by the door. It’s a genuinely useful way to use up those bits of wood that always seem to pile up.
20) Wooden garden markers

Got some leftover wood bits? Those little scraps are perfect for garden markers, just cut them into strips or stakes, whatever feels right. Give them a quick sanding so they’re not too rough, and you’ll have a nice surface for painting or scribbling names.
You could use paint pens, stencils, or even try your hand with a wood-burning tool if you’re feeling artsy. Or maybe you’re into that unfinished, rustic vibe, just grab a permanent marker and write directly on the wood. It’s simple.
If you drill a tiny hole at the top, you can tie the markers to stakes with some twine. It’s a handy way to keep them from vanishing under the leaves or dirt.