
Getting started with blacksmithing can feel a bit intimidating, but honestly, it gets a lot more fun when you dive into some simple, satisfying projects. You pick up the core techniques, one hammer blow at a time, and suddenly you’ve got pieces you can use, show off, or hand out to friends.
This list of forging projects keeps things simple and hands-on. You’ll start out with easy hooks and keychains, then maybe try your hand at some tools or decorative bits. Each project teaches you something new, but nothing’s too wild or complicated. By the time you work through a few, you’ll probably feel a lot more confident about tackling bigger ideas.
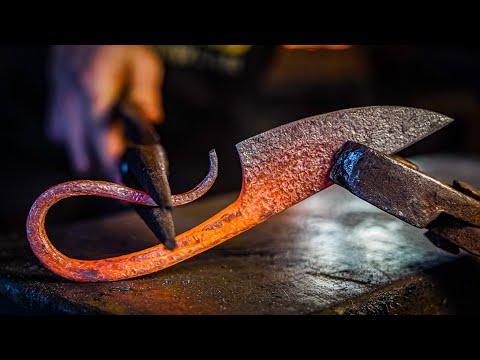
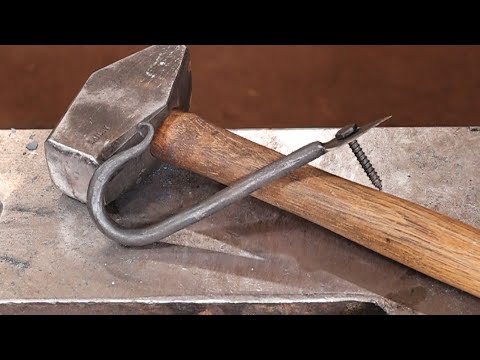
1) Simple S-hooks

You’ll probably make a bunch of S-hooks when you’re starting out, they’re quick, useful, and let you practice basic hammering moves. All you need is a short bit of mild steel, a hammer, and tongs.
Just curl one end into a loop, then bend the other side the opposite way to get that “S” shape. Quench it once the curve looks right.
They’re handy for hanging whatever – tools, utensils, random stuff in the shop. Making a few helps you get the hang of bending, tapering, and working with heat without burning through a lot of material.
2) Wall Hooks

Wall hooks are a classic beginner project. You’ll practice basic blacksmithing moves like drawing out metal, tapering ends, and bending smooth curves. It’s a solid way to get a feel for how steel moves under the hammer.
A hook barely uses any steel and you can finish one pretty quickly. Punch a hole for mounting, twist the shank for a bit of flair, or mess around with the shape. No two end up looking quite the same.
They’re actually useful around the shop or house; hang up coats, tools, keys, whatever. Good practice, and you don’t end up with a pile of stuff you’ll never use.
3) Bottle Openers

Forging a bottle opener is a surprisingly good way to learn. You’ll practice drawing out metal, making curves, and punching or drifting a hole for the opener’s lip. All those skills come in handy later.
Start with a piece of mild steel, maybe 6 to 8 inches long. Heat one end, flatten it, and shape the hook that grabs the bottle cap. Tweak the handle and maybe add some texture or a twist if you’re feeling it.
It’s a fast project and you get something you’ll actually use, or give away if you’re feeling generous.
4) Forged Leaves

Forging a leaf is a fun way to pick up some shaping skills. Just grab a small piece of mild steel, heat it up, and taper one end for the tip. Flatten out the rest to get that leaf shape.
Add some texture with lighter hammer blows to mimic veins, or use a chisel to mark the center line.
Once you’re happy with the shape, brush off the scale and hit it with a little oil or wax. These look nice as pendants, keychains, or just little accents for bigger projects.
5) Basic Utensils

Making simple utensils is a great way to practice shaping and tapering evenly. Start with spoons, forks, or small ladles using mild steel or whatever scrap you have. You’ll get a feel for controlling thickness and balance, but nothing’s too complicated.
Hammering out curves and edges gives you a lot of practice, and each utensil is a chance to get your rhythm down.
Once you’re comfortable, try twisting the handle or adding some texture to keep it interesting.
6) Fireplace Pokers

Fireplace pokers are kind of a rite of passage. They’re straightforward, practical, and let you work with longer pieces of steel. You’ll practice drawing out a taper and making a handle that actually feels good to hold.
Use a length of mild or high-carbon steel rod. Heat one end for the tip, then bend or twist the other for a handle. A little curl or loop adds some style, and it’s honestly kind of fun.
When you’re done, brush off the scale and give it a quick coat of oil or wax so it doesn’t rust.
7) Keychains

Keychains are perfect for beginners as they’re small, use hardly any steel, and let you practice tapering, twisting, and shaping. Plus, you don’t need a bunch of fancy tools.
Try making a leaf or heart to get the hang of texture and symmetry. These quick projects help you learn heat control and hammer pressure, but you’re not stuck at the anvil for hours.
Once you’re happy with the shape, add a loop or ring. They make great little gifts, and you’ll see your skills improve with each one.
8) Rebar Decorative Snail
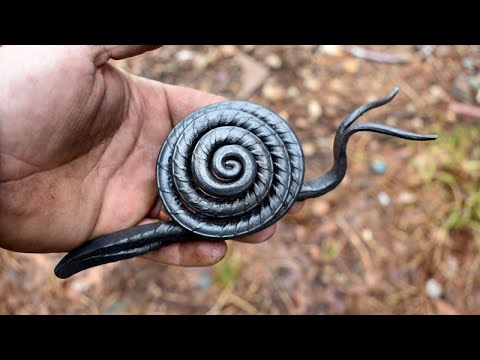
Forge a simple snail from scrap rebar – a quick, creative project that’s perfect for beginners and a great way to make extra income for shop upgrades. Heat and curl one end into a spiral shell, then taper and shape the body with a hammer and anvil.
These small decorative pieces are fun to make, great for practicing blacksmithing techniques, and popular sellers at markets or online.
9) Decorative Nails

Once you’re comfortable working with small bits of metal, decorative nails are a fun way to practice hammer control and consistency.
Cut mild steel bars (about 3/8 inch thick) into short pieces. Heat one end, taper it to a point, and use a nail header to shape the head.
Try adding some texture or a twist to make each one unique. You’ll get better at shaping and finishing with every nail.
10) Small Hooks for Hanging

Small hooks are a classic for a reason. They’re quick, useful, and let you practice tapering, bending, and scrolling. You’ll use these for hanging tools, keys, or even kitchen stuff.
Grab some mild steel about a quarter-inch thick. Heat one end, draw it out to a point, and curl it into a loop. Then bend the other end into a hook using the anvil’s horn.
Quench and brush it clean. You can leave the metal raw, or oil it to slow down rust.
11) Forged Garden Sickle
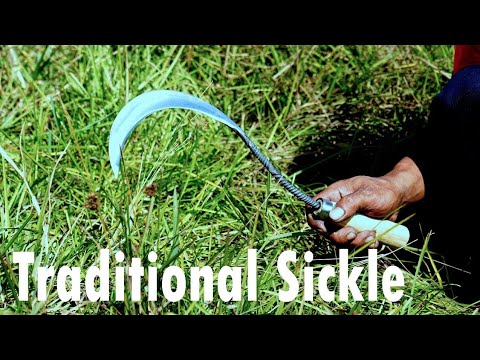
Forge a Traditional Rebar Hand Sickle using simple blacksmithing techniques and scrap materials. Heat and flatten one end of the rebar, then curve and sharpen it into a functional blade shape. Add a wooden or wrapped handle for comfort and control.
This project blends practicality with craftsmanship, perfect for learning shaping, tapering, and edge-forming skills while creating a durable, rustic tool.
12) Letter Openers

Forging a letter opener is a solid way to practice shaping and tapering. It’s small, simple, and you can use mild steel or even a bit of rebar or horseshoe if that’s what you’ve got.
Draw out the blade to a thin, even edge, then shape a handle that feels comfortable. Try to keep the shape balanced and smooth.
Quench and polish it up for a clean finish. You’ll have something practical, and it’s a nice little way to show off your progress.
13) Simple Knife Blades
If you’re just getting into blade work, starting with a small, straightforward knife is a solid move. You’ll get a feel for shaping, tapering, and refining edges, plus, you’ll learn to keep your heat and hammering under control. A lot of folks grab mild steel or maybe an old file before they mess with high-carbon steel.
Don’t overthink the design, as something with a straight spine and a short cutting edge is way easier to handle at first. It’s better to focus on keeping the thickness even and the bevels smooth than trying anything wild or fancy. If you nail the forging, grinding and heat treating later will be way less of a headache.
14) Tongs

Making your own tongs is a rite of passage for most smiths, plus, you’ll use them all the time. There’s something satisfying about crafting a pair that actually fits your hands. Mild steel flat bar is ideal here since it’s forgiving and easy to move.
Heat it up and get the jaws shaped first, making sure both sides match up so they close tight and square. After that, draw out the reins until they feel right for your grip and give you enough reach to handle hot stuff safely.
Punch or drill the rivet hole and put the halves together. Give them a test run before you tweak the fit. A smooth hinge really does make all the difference.
15) Hooks for Hanging Tools
Hooks are one of those projects that just make sense when you’re starting out. Wall hooks or S-hooks are perfect for practicing how to shape and bend steel without too much pressure.
Try out different sizes for hanging tools or whatever else you’ve got in your shop. Each new shape is a chance to experiment with curves, twists, and getting a clean finish.
Make sure to round off the ends so nothing gets scratched up. Once you’re feeling good about the basics, maybe try adding a curl or a little leaf detail for fun.
16) Forged Candle Holders

A candle holder is a surprisingly rewarding project for how little material it needs. Just grab a short steel rod and a few basic tools. Heat it up, twist or coil for the base and stem, then flatten out a disk or cup on top to hold the candle.
There’s a lot of room to mess around with shapes. Some people go for spirals, others like to forge out a leaf or petal. Even a plain, simple holder looks nice once you brush it off and finish it with a bit of wax or oil.
It’s a great way to get comfortable with tapering, twisting, and bending – stuff you’ll use constantly in blacksmithing.
17) Twisted Steak Fork

Create a Forged Twisted Meat Fork using a 28-inch piece of 1/4-inch round stock – an ideal project for practicing basic blacksmithing techniques. Heat the metal, draw out and split one end to form the fork tines, then twist the handle for a decorative touch.
Finish by shaping the end into a loop or curl for hanging. This simple yet elegant utensil is perfect for grilling, campfire cooking, or as a handcrafted gift.
18) Small Decorative Plates

Forging small decorative plates can be a fun break from straight lines and angles. Use mild steel or copper, heat it up, and hammer it over a rounded form until you’ve got a shallow dish. A ball-peen hammer is your friend here for shaping those gentle curves.
You can add some interest by stamping or lightly chiseling in a design while the plate’s still warm. Nothing too complicated, just enough to give it a bit of character.
Once you’re happy with the shape, brush or polish it to bring out the texture. Leaving it raw gives a rustic vibe, or you can seal it with wax if you want to keep rust away.
19) Forged Coathooks

Coathooks are a classic starter project. They’re practical, not too tricky, and you’ll get a lot out of practicing hammer control. Just grab a short piece of mild steel and heat it evenly. Taper one end to form the hook.
Bend it around the horn of your anvil or a bending fork. Take your time to get a smooth, balanced curve. Flatten the other end and punch or drill holes for mounting screws.
Brush off any scale and finish with oil or wax to keep it protected. These hooks look right at home in mudrooms, workshops, or hanging by the back door.
20) Basic Hammer Heads

If you’re looking to get more comfortable shaping and balancing metal, forging a simple hammer head is a classic place to start. Grab a solid chunk of medium-carbon steel and heat it up nice and even before you try to shape it. It’s worth taking your time here; keeping the face flat and the peen side tidy really does make a difference when you’re actually using it.
When you’re punching the eye for the handle, aim for dead center and as smooth as you can manage. A good, well-formed eye just feels right in your hand and lets you control the hammer much better down the line.
After everything cools off, grind the surfaces to your liking and harden the face with a bit of careful heat treatment. It’s a hands-on way to get the hang of accuracy and learn how to work with metal thickness.