
Working with small pieces of wood is a great way to practice useful skills without needing a huge workshop or expensive tools. It’s honestly kind of satisfying to turn scraps into something that looks good and actually has a purpose in daily life. You’ll see how simple projects can make woodworking feel less intimidating and give you results you’ll want to use.
These projects don’t take over your whole workspace, but there’s still plenty of variety; think home organization, little decorative things, all sorts of stuff. It’s a chance to try out new tools, mess with different techniques, and just get more comfortable with wood, all while keeping things pretty manageable.
1) Wooden Coasters
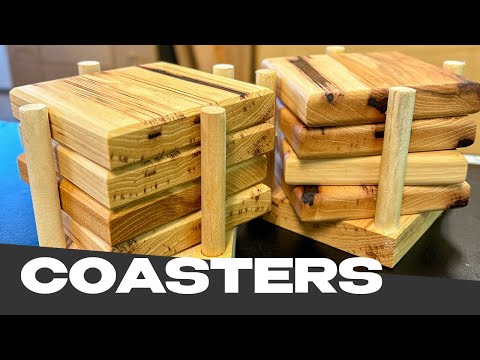
Got a bunch of wood scraps? You can make simple coasters to keep water rings off your tables. Really, you just need a flat piece and smooth edges to get started.
Chop the scraps into squares or circles, then sand them down so nobody gets a splinter. Throw on a finish like stain, paint, or sealant to help them last.
If you’re feeling creative, try wood burning, stenciling, or painting a pattern. Each coaster ends up a bit different, which is half the fun. They’re quick to make and honestly make great little gifts.
2) Phone Stand

A phone stand is one of those projects you can finish in under an hour. Just grab a couple of scraps! A flat base and a shorter piece for the angle. Cut a little notch so your phone actually stays put.
If you’re new to this, keep it simple. Just cut a straight slot and sand the edges so your phone doesn’t get scratched.
Want to fancy it up? Shape the wood a bit or slap on a coat of oil. Even a quick finish can make it look way more polished.
3) Jewelry Box

Turn those wood scraps into a jewelry box that’ll keep all your little treasures in one spot. Usually, you start with a rectangle and a lid that fits, but you can get as detailed as you want.
Throw in a divider or two, or maybe a little hook for necklaces if you’re feeling ambitious.
No need for fancy tools, just a saw, glue, and some sandpaper will do. You can finish it up with paint, stain, or a clear coat to match your vibe and keep the wood protected.
4) Cutting Board

Cutting boards are classic! Super easy, super useful, and a great way to use up hardwood scraps. You just need a few pieces, some glue, and sandpaper.
Keep it simple with one piece or glue strips for a striped look. Once you’ve shaped and sanded it, slap on a food-safe finish so it lasts.
It’s a good excuse to practice measuring and finishing, and you get something handy for your kitchen, or maybe a quick gift.
5) Plant Stand

Small scraps can totally become a plant stand for inside or outside. Even short offcuts work if you just want to prop up a potted plant.
Try hairpin legs on a wood round for that mid-century vibe, or stack some planks for a rustic box shape.
If you’re into an industrial look, mix in concrete blocks or leftover wood. These don’t need much material, and you can paint or stain them to fit your space.
6) Key Holder

A simple wall-mounted key holder is one of those “why didn’t I make this sooner?” projects. Just grab a flat scrap, add a few hooks, and you’re basically done.
Paint, stain, or stick on a chalkboard tile if you want to jazz it up. That way, it matches your entryway without much fuss.
Mount it by the door, and you’ll never have to hunt for your keys again. Quick, easy, and actually useful.
7) Picture Frame

Scraps are perfect for DIY picture frames, especially if you want something custom. Cut thin strips to size, sand ‘em smooth, and glue or nail them together.
For a rustic feel, leave the wood raw or just hit it with a little stain. If you want a cleaner look, go with paint.
Old pallets, broken chairs, or leftover trim all work. With a few basic tools, you can make frames for hardly any money, and they’ll still look good on your wall.
8) Wall Shelf

A wall shelf is a quick way to use up a couple of boards and add storage without taking over your floor. Just cut your wood, sand the edges, and screw it onto some brackets.
Once it’s up, you’ve got a spot for books, plants, or whatever else needs a home. Paint or stain it to match your room, or just leave the wood as-is for a more relaxed look.
Using scraps means each shelf ends up a little different, which is kind of nice.
9) Desk Organizer

A few wood scraps can become a simple desk organizer for pens, pencils, paper clips, whatever’s always rolling around. Just cut and sand the pieces, then glue or screw them together.
You can keep it basic with a box, or add dividers if you want more compartments. Paint or stain it for a finished look, or just leave the wood raw if you’re into the natural vibe.
10) Birdhouse

A birdhouse is a classic way to use up leftover wood. You don’t need fancy tools, just a few boards, some nails, and glue.
Try mixing in odd shapes or upcycled bits like an old drawer front or a teapot lid if you want something quirky. Those little details make it feel more personal.
Hang it in your yard and you’ll have a front-row seat to the birds – plus, it’s a nice way to use up those scraps.
11) Napkin Holder

Napkin holders are one of those things you don’t think about until you need one. Just cut two panels for the sides, a base, and maybe a couple of dowels or strips for support.
Keep it basic if you’re short on time, or sand and stain it for a more finished look. Scrap wood works great, no need for fancy lumber.
If you’re into rustic, leave it unfinished. Otherwise, a coat of paint or clear finish will keep it looking sharp.
12) Serving Tray

A serving tray is a handy project for using up short boards or scrap planks. Just cut them to size, tack on some side rails, and add handles. You can use hardwood, plywood – whatever you’ve got lying around.
Give it a good sanding and finish with stain, paint, or a clear coat. Handles can be metal, rope, or just cutouts.
It works for serving snacks, corralling odds and ends, or just looking cool on a coffee table. Plus, it comes together fast.
13) Candle Holder

Candle holders are a fun way to use up wood scraps, just grab a drill and some sandpaper. A flat block is perfect for tea lights, or use a longer piece for a row of candles.
Try playing around with shapes, squares, rectangles, even little log slices. Sand the edges so they feel nice, then seal with oil or a clear finish.
If you’re nervous about open flames, just use LED candles. You still get the cozy look, minus the worry about burning your project down.
14) Wooden Spoon

Making a wooden spoon from a chunk of hardwood is oddly satisfying, and you don’t need a ton of fancy gear -just some basic carving tools. Sketch the outline right on the wood, then hack out the rough shape with a saw.
Next up, carve out the bowl part using a gouge or chisel. Sand everything down until it feels nice and smooth, as nobody wants splinters in their soup.
A bit of food-safe oil at the end gives it some protection and brings out the grain. It’s a small project, but you end up with something you’ll actually use in the kitchen, and hey, it’s a decent way to practice carving on a manageable piece.
15) Recipe Box

A recipe box is one of those woodworking projects that’s both useful and pretty simple. It’s a great way to wrangle all those recipe cards, and honestly, it doesn’t take much wood at all; scraps work just fine.
Just cut your pieces, glue them up, and you’ve got the basics. Want to get a little fancier? Add a lid or some dividers for extra organization.
Hardwoods, softwoods, whatever you’ve got lying around can work. Sand it smooth and pick a finish that fits your vibe: oil, stain, paint, whatever looks good in your kitchen.
16) Small Toolbox

Building a compact toolbox is a solid project if you want something practical without a lot of fuss. A few short boards and some screws are really all you need. The classic style is just a rectangle with a flat bottom and open top, but adding a handle across the top makes it so much easier to lug around.
Cut your pieces, smooth the edges, and screw or nail everything together. No need to get fancy, basic butt joints do the trick. A quick coat of paint or some wood finish keeps it looking sharp and helps it last.
It’s a handy way to keep tools from wandering all over the place, and you’ll get some good practice with measuring and cutting along the way.
17) Drawer Dividers

Got messy drawers? Small wood scraps are perfect for making custom dividers. Just cut them to fit, glue or slot them together, and you’re set.
These are great for kitchen utensils, desk supplies, even bathroom stuff. If you want them adjustable, cut notches so the pieces slide together – super simple.
Not a fan of power tools? Thin plywood or craft boards can usually be scored and snapped to size. Sand the edges so you don’t get poked every time you open the drawer.
18) Wooden Toys

Turning leftover wood into toys is honestly pretty fun, and kids seem to love the results. Blocks, cars, spinning tops, they don’t need much more than a saw, some sandpaper, and a bit of imagination.
Try making a few animals or simple vehicles if you’re feeling creative. Sand the edges so they’re safe for small hands, and you can leave them natural or add a splash of non-toxic paint for color.
Yo-yos and pull toys are also easy wins. These projects don’t eat up much time, and it feels good to give new life to scraps instead of tossing them.
19) Coat Rack
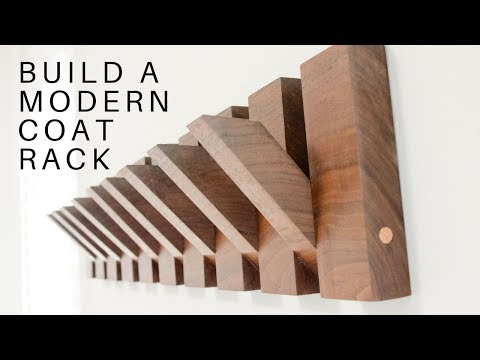
A wall-mounted coat rack is one of those projects that’s way easier than it looks. Grab a straight piece of scrap wood for the base, screw in a few hooks, and you’re basically done.
It’s perfect for the entryway or mudroom, keeping jackets, bags, and keys from piling up everywhere. You don’t need anything fancy, just a drill, some screws, and a level if you want it straight.
If you like a rustic look, try using reclaimed wood or pallet boards. Prefer something cleaner? Sand and paint it before adding hooks. Either way, you’ll have it up in no time.
20) Bookends

Honestly, making your own bookends from leftover wood scraps is pretty satisfying, no fancy tools required. Just cut two pieces for each end: one for the base, one for the upright. Stick ’em together with glue or screws, whatever feels right.
You could leave the wood as-is for a rustic vibe, or go wild with paint or stain to match your shelves. I’d definitely recommend sticking some felt pads underneath so you don’t scratch up your furniture or have your bookends sliding all over the place.
Want to get clever? Try shaping the wood into numbers, letters, or even quirky geometric patterns. Even tiny offcuts can turn into functional bookends that’ll keep your books standing tall and your shelves looking neat.