

You can make these 12 Christmas crafts for kids at home with everyday supplies, from a paper countdown chain and handprint keepsake to homemade ornaments and a reusable snowman puzzle. Paper scraps and clean packaging give you plenty to work with, and your child’s uneven cutting or unexpected color choices give each piece its own character.
You’ll find estimated active times below, with drying time listed separately. Cover your table, choose age-appropriate supplies, and stay nearby throughout. For children under 3 or anyone who mouths objects, use drawn details and large paper pieces; keep small decorations out of reach.
1) Paper Christmas Countdown Chain

You turn strips of construction paper into a Christmas countdown your child can shorten each day.
- Materials: Construction paper, markers, scissors, and tape or a glue stick.
- Time: About 15–20 minutes; no drying with tape.
- Age fit: Ages 3+ with precut strips; independent cutting for confident scissor users.
- Your preparation: Cut strips approximately 1 inch wide and 6 inches long.
Make one link for each day remaining until Christmas, then loop each new strip through the previous ring before securing its ends. If you begin on December 1, use 24 links and remove the last one on Christmas Eve.
Let your child decorate the strips before assembly. With construction-paper crafts, you have room to practice patterns: alternate two colors or repeat a favorite combination. Hang your chain away from heaters and open flames.
2) Handprint Christmas Tree Keepsake

You preserve your child’s hand size by arranging green paper handprints into a Christmas tree.
- Materials: Green paper, cardstock backing, pencil, scissors, glue stick, and markers.
- Time: About 20–25 minutes; allow roughly 15 minutes for glued layers to set.
- Age fit: Ages 2+ with your tracing and cutting help.
- Your preparation: Trace and cut several handprints, especially for younger children.
Arrange the handprints with fingers pointing downward, overlapping them in rows that narrow toward the top. Glue them onto cardstock, then add a paper trunk and a star.
Your child handles the decorating, whether that means dots of marker or oversized paper ornaments. As with other handprint crafts, adding your child’s name and the year makes the finished piece a useful record of those small hands. Let the layers set flat before displaying your keepsake.
3) Fork-Painted Christmas Tree

With a fork, you give a painted Christmas tree textured, needle-like branches.
- Materials: Cardstock, washable green paint, a blunt fork, paintbrush, and colored markers.
- Time: About 15 minutes; allow 30–60 minutes for thin paint to dry.
- Age fit: Ages 3+ with close supervision.
- Your preparation: Pour a shallow puddle of paint and sketch a light triangle as a guide if helpful.
Dip the fork tips into paint, then press and pull short strokes outward from the tree’s center. Begin with wide branches at the bottom and work toward a narrow top.
Keep the paint layer thin so the fork marks remain visible. Once your tree is dry, your child can draw ornaments between the branches and add a star. Keep the fork at the table and supervise its use throughout.
4) Paper Santa Beard Cutting Craft

You give beginning scissor users a clear stopping point by drawing cutting lines on Santa’s paper beard.
- Materials: White paper, colored paper, glue stick, markers, and child-size blunt-tip scissors.
- Time: About 15–20 minutes; no substantial drying time.
- Age fit: Ages 4+ when ready for supervised scissor practice.
- Your preparation: Assemble a simple Santa face above a long white rectangular beard.
Draw vertical lines from the beard’s lower edge, leaving an uncut band beneath Santa’s face. Add a horizontal stop line so your child knows where each snip should end.
Hold the paper steady if needed while your child cuts along the lines. Use widely spaced lines for early practice and narrower strips for experienced cutters. For a younger sibling, offer precut beard strips to glue beneath a separate Santa face.
5) Cardboard and Yarn Christmas Tree
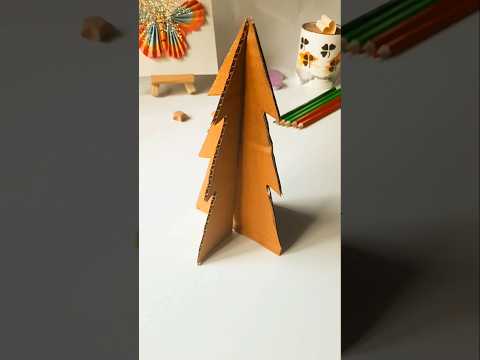
Wrapping yarn around a cardboard triangle gives you a textured tree without a foam base.
- Materials: Clean corrugated cardboard, yarn, tape, scissors, and a paper star.
- Time: About 20 minutes; no drying with taped decorations.
- Age fit: Ages 4+ with help managing the yarn.
- Your preparation: Cut a tree triangle and make shallow notches along both sides.
Tape one yarn end to the back. Have your child wrap yarn across the front, catching it in the notches to keep it from sliding. Secure the loose end with another piece of tape.
As with other string and yarn projects, manageable lengths help prevent tangles. Offer short sections and join them on the back as needed. Finish with a paper star, leaving some cardboard visible wherever your child chooses.
6) Handprint Grinch Painting

You create a recognizable Grinch face from a green handprint, pointed fingertips, and an oversized grin.
- Materials: White cardstock, green finger paint labeled for skin contact, brush, markers, and red paper.
- Time: About 15–20 minutes; allow 30–60 minutes before adding details.
- Age fit: Ages 2+ with handwashing help.
- Your preparation: Set out a damp cloth and cut a red paper Santa hat.
Brush a thin layer of paint onto your child’s palm and fingers, then help press the hand onto cardstock. Lift it straight up to keep the print clear.
After drying, turn the print so the fingers point downward. Draw eyes in the palm area, then add slanted eyebrows and a curling smile. Your child can glue the hat above the face and choose how mischievous the expression looks.
7) Paper Plate Snowman

A white paper plate gives you a ready-made snowman face with plenty of space for decorating.
- Materials: Uncoated white paper plate, orange and black paper, markers, glue stick, and paper scarf strips.
- Time: About 15–20 minutes; allow 15–30 minutes for glued pieces to set.
- Age fit: Ages 2+ with precut features.
- Your preparation: Cut a carrot-shaped nose and a broad paper hat.
Have your child position the nose and hat before gluing them down. Draw eyes and a dotted smile, then attach scarf strips beneath the plate.
You can keep crafts with disposable items affordable by using an unused plate left over from a gathering. Offer large paper shapes for younger children and let older children design patterned scarves. Lay your snowman flat until the hat stays firmly attached.
8) Cardboard Tube Reindeer

You turn a clean cardboard tube into a standing reindeer with paper antlers and a drawn face.
- Materials: Cardboard tube, brown paper, red paper, markers, scissors, and tape.
- Time: About 20 minutes; no drying with tape.
- Age fit: Ages 3+ with prepared pieces.
- Your preparation: Cut a paper towel tube to size and cut broad, sturdy antlers.
Wrap the tube in brown paper and tape the seam at the back. Attach antlers inside the top edge, then let your child draw eyes and glue or tape on a large red paper nose.
For cardboard roll crafts, a flat lower edge helps your character stand securely. Trim any uneven edge yourself before decorating. Add a paper collar around the base if your child wants another splash of color.
9) Colorful Christmas Ornaments

Plastic baubles become playful Christmas decorations with colorful art tape and googly eyes.
- Materials: Lightweight plastic baubles, colorful art tape, googly eyes, and craft glue if the eyes aren’t self-adhesive.
- Time: About 15–20 minutes; allow extra time for glue to dry.
- Age fit: Ages 3+ with adult supervision.
- Your preparation: Set out the baubles and tape, and check that each ornament has a secure hanging loop. Choose lightweight, shatter-resistant baubles for younger children.
Your child can wrap strips of art tape around each bauble to make stripes, patterns, or colorful patches. Add googly eyes to create silly faces or little Christmas characters.
Press the tape down firmly so the edges don’t lift. If the googly eyes aren’t self-adhesive, an adult can apply a small amount of craft glue and help hold them in place while it dries. Keep small eyes and loose craft materials away from children who may put them in their mouth
10) Cotton Ball Santa Christmas Card

You make a tactile Christmas card by adding a cotton-ball beard to a paper Santa face.
- Materials: Cardstock, colored paper, cotton balls, washable school glue, and markers.
- Time: About 20 minutes; allow 1–2 hours for glue to dry.
- Age fit: Ages 3+ with close supervision around loose cotton.
- Your preparation: Fold the card and cut a face shape plus a red hat.
Glue the face and hat onto the front, then draw Santa’s features. Show your child how to add small glue dots around the chin before pressing cotton into place.
With cotton crafts, gently stretched pieces give you a fluffy beard using fewer cotton balls. Keep the card open and flat while drying. Help your child write a message inside before adding bulky decoration.
11) Painted Snowman Rock Puzzle

You create a reusable tabletop puzzle by painting separate rocks as a snowman’s head and body sections.
- Materials: Three smooth, palm-size rocks, white acrylic paint labeled non-toxic, brushes, colored paint, and cardboard.
- Time: About 25–35 active minutes; allow several hours between coats as needed and follow label drying guidance.
- Age fit: Ages 6+ with supervision.
- Your preparation: Wash and dry the rocks; check for sharp edges.
Choose flat rocks that rest securely side by side. Paint them white, then add a face to the smallest and buttons or a scarf to the others.
Protect clothing during acrylic paint crafts, since dried paint resists washing out. Trace the finished arrangement onto cardboard to make a matching board. Keep your puzzle on a low table, away from younger children who mouth objects.
12) Paper Nativity Scene

For an optional religious Christmas project, you can assemble a paper nativity showing Mary, Joseph, and baby Jesus.
- Materials: Cardstock backing, colored paper, pencil, scissors, glue stick, and markers.
- Time: About 25–30 minutes; allow roughly 15 minutes for glued layers to set.
- Age fit: Ages 3+ with prepared shapes; older children can design their own figures.
- Your preparation: Cut a stable outline, simple robe shapes, and a small manger.
Glue the stable onto your backing first. Help your child arrange the figures before attaching them, leaving space above for a paper star.
Choose clothing colors and skin tones together, and let your child draw faces at their own level of detail. If your family observes Christmas religiously, use the activity to talk about the birth of Jesus. Add your child’s name and date on the back before displaying the scene.